Office 365 Migration Api using C#
This blogpost describes how to use the Office 365 Migration Api using your own C# code.
The Office365 Migration Api enables you to upload lots of documents into SharePoint Online without being throttled.
What is the Migration Api?
I assume that you know what the Migration Api is and when to use it.
Steven Pogrebivsky has written an blogpost on this subject which I recommend to read first.
Also Benjamin Niaulin of Share Gate has written an blogpost, off course promoting their software which can help you with your migration.
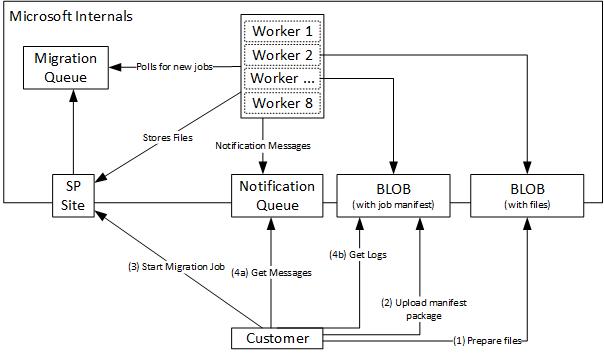
In short, it boils down to the following flow:
The Microsoft PowerShell Scripts
Microsoft provides some PowerShell cmdlets to help you migrate data using the Migration Api. Using the SharePoint Online Management Shell Windows PowerShell environment you can use a set of Migration Api related operations.
What this cmdlets basically do, is:
-
They create a manifest package containing xml files with references to your files
-
Upload your files to Azure Storage
-
Use Site.CreateMigrationJob() to start the MigrationJon
-
Read the reporting-queue to provide current job-status
This PowerShell scripts are easy to use but do not bring a lot of flexibility. For example:
-
Impossible to migrate custom metadata
-
Can not (or hardly) be automated
-
Only one source or destination (folder)
-
Reporting on running job is very basic
Undocumented features
Some technical parts of this migration process are documented, like Site.CreateMigrationJob().
Other parts are not (well) documented, for example the structure of the manifest-package and the reporting-queue messageformat.
There’s also no example project on how to do advanced migration scenario’s and how to use the Api’s yourself.
Migration using C#
All the things the PowerShell scripts do, we can do ourselfs using .NET. I created a Proof Of Concept C# Console Application doing.
Lets check some code, the 4 steps refer to the image in the first paragraph:
class Program
{
	static void Main(string[] args)
	{
		var migrationApiDemo = new MigrationApiDemo();

		// Step 1, Create and upload some test-files to Azure Blob Storage
		migrationApiDemo.ProvisionTestFiles();

		// Step 2, Create and upload Manifest Package to Azure Blob Storage
		migrationApiDemo.CreateAndUploadMigrationPackage();

		// Step 3, Start the Migration Job using SharePoint Online Clientside Object Model (CSOM)
		var jobId = migrationApiDemo.StartMigrationJob();

		// Step 4, Monitor the Reporting Queue, persist messages/logs and wait for the job to complete
		migrationApiDemo.MonitorMigrationApiQueue(jobId).Wait();

		Console.ReadLine();
	}
}
The test files are provisioned to Azure but are generated in-memory:
public  ICollection<SourceFile> ProvisionAndGetFiles()
{
	var testfiles = new[]
	{
		new SourceFile
		{
			Filename = "test.txt",
			LastModified = DateTime.Now,
			Contents = Encoding.UTF8.GetBytes("Hi, this is a test text-file"),
			Title = "Title of file 1"
		},
		new SourceFile
		{
			Filename = "test2.txt",
			LastModified = DateTime.Now.AddDays(-1),
			Contents = Encoding.UTF8.GetBytes("Tesfile2"),
			Title = "Second title"
		}
	};

	_log.Debug("Removing all existing files on test blob...");
	_azureBlob.RemoveAllFiles();

	_log.Debug($"Uploading {testfiles.Length} files on test blob...");
	foreach (var testfile in testfiles)
		_azureBlob.UploadFile(testfile.Filename, testfile.Contents);

	return testfiles;
}
In a real life scenario this needs to be replaced with code getting the files from your source location, a network-drive, a legacy system or …? For now it’s important to know that the source-files can he loaded from any source but you have to write your own reader.
Now we need to create a manifest-package
public IEnumerable<MigrationPackageFile> GetManifestPackageFiles(IEnumerable<SourceFile> sourceFiles)
{
	Log.Debug("Generating manifest package");
	return = new[]
	{
		GetExportSettingsXml(),
		GetLookupListMapXml(),
		GetManifestXml(sourceFiles),
		GetRequirementsXml(),
		GetRootObjectMapXml(),
		GetSystemDataXml(),
		GetUserGroupXml(),
		GetViewFormsListXml()
	};
}
The package contains 8 XML files all of them are very small/static beside the ‘Manifest.xml’ file, this file contains all the references to our source files.
Now that we have to Azure Blob Containers we can start the Migration Job:
/// <returns>Job Id</returns>
public Guid StartMigrationJob()
{
	var sourceFileContainerUrl = _testDataProvider.GetBlobUri();
	var manifestContainerUrl = _blobContainingManifestFiles.GetUri(
		SharedAccessBlobPermissions.Read
		| SharedAccessBlobPermissions.Write
		| SharedAccessBlobPermissions.List);

	var azureQueueReportUrl = _migrationApiQueue.GetUri(
		SharedAccessQueuePermissions.Read
		| SharedAccessQueuePermissions.Add
		| SharedAccessQueuePermissions.Update
		| SharedAccessQueuePermissions.ProcessMessages);

	return _target.StartMigrationJob(sourceFileContainerUrl, manifestContainerUrl, azureQueueReportUrl);
}
Office 365 will start this migration job and report any update (progress, fail of success) to the reporting-queue
public async Task MonitorMigrationApiQueue(Guid jobId)
{
	while (true)
	{
		var message = await _migrationApiQueue.GetMessageAsync<UpdateMessage>();
		if (message == null)
		{
			await Task.Delay(TimeSpan.FromSeconds(1));
			continue;
		}

		switch (message.Event)
		{
			case "JobEnd":
				Log.Info($"Migration Job Ended {message.FilesCreated:0.} files created, {message.TotalErrors:0.} errors.!");
				DownloadAndPersistLogFiles(jobId); // save log files to disk
				Console.WriteLine("Press ctrl+c to exit");
				return;
			case "JobStart":
				Log.Info("Migration Job Started!");
				break;
			case "JobProgress":
				Log.Debug($"Migration Job in progress, {message.FilesCreated:0.} files created, {message.TotalErrors:0.} errors.");
				break;
			case "JobQueued":
				Log.Info("Migration Job Queued...");
				break;
			case "JobWarning":
				Log.Warn($"Migration Job warning {message.Message}");
				break;
			case "JobError":
				Log.Error($"Migration Job error {message.Message}");
				break;
			default:
				Log.Warn($"Unknown Job Status: {message.Event}, message {message.Message}");
				break;

		}
	}
}
How to use this code
You first need:
-
A SharePoint Online tenant with credentials, with write access to the destination Site/Document Library/Folder
-
An existing Site with an existing Document Library to migrate the files to
-
An acountname and accountkey of at least one Azure Storage account, for one migration job, we need two Blob Containers and one Queue. They can be in the same Storage Account but that is not required.
After setting these variables in the appsettings-section of the App.config file you’re good to go, just run the application. After running this application succesfully, two test-files will be uploaded in the configured SharePoint environment. Log files will be stored in the application folder using log4net’s FileAppender.
This application is just to show you how to migrate files using .NET with a minimal set of code. It cannot be used as-is in real world scenario’s!
When you want to use this code, the first thing to change will be the origin of the files from in-memory-generation to (for example) a folder.
More information
Feel free to use this code for own/commercial use. For questions or information, contact me!