Deploy your Azure Functions using Visual Studio Team Services
Azure Functions have been around for a couple of months now and I start using them more and more. Recently I wanted to deploy my Azure Function as part of a CI/CD flow in Visual Studio Team Services (VSTS) Release Management. I’d like to share how I did this.
Why
Continuous Deployment can be enabled using the standard AppService deployment blade:
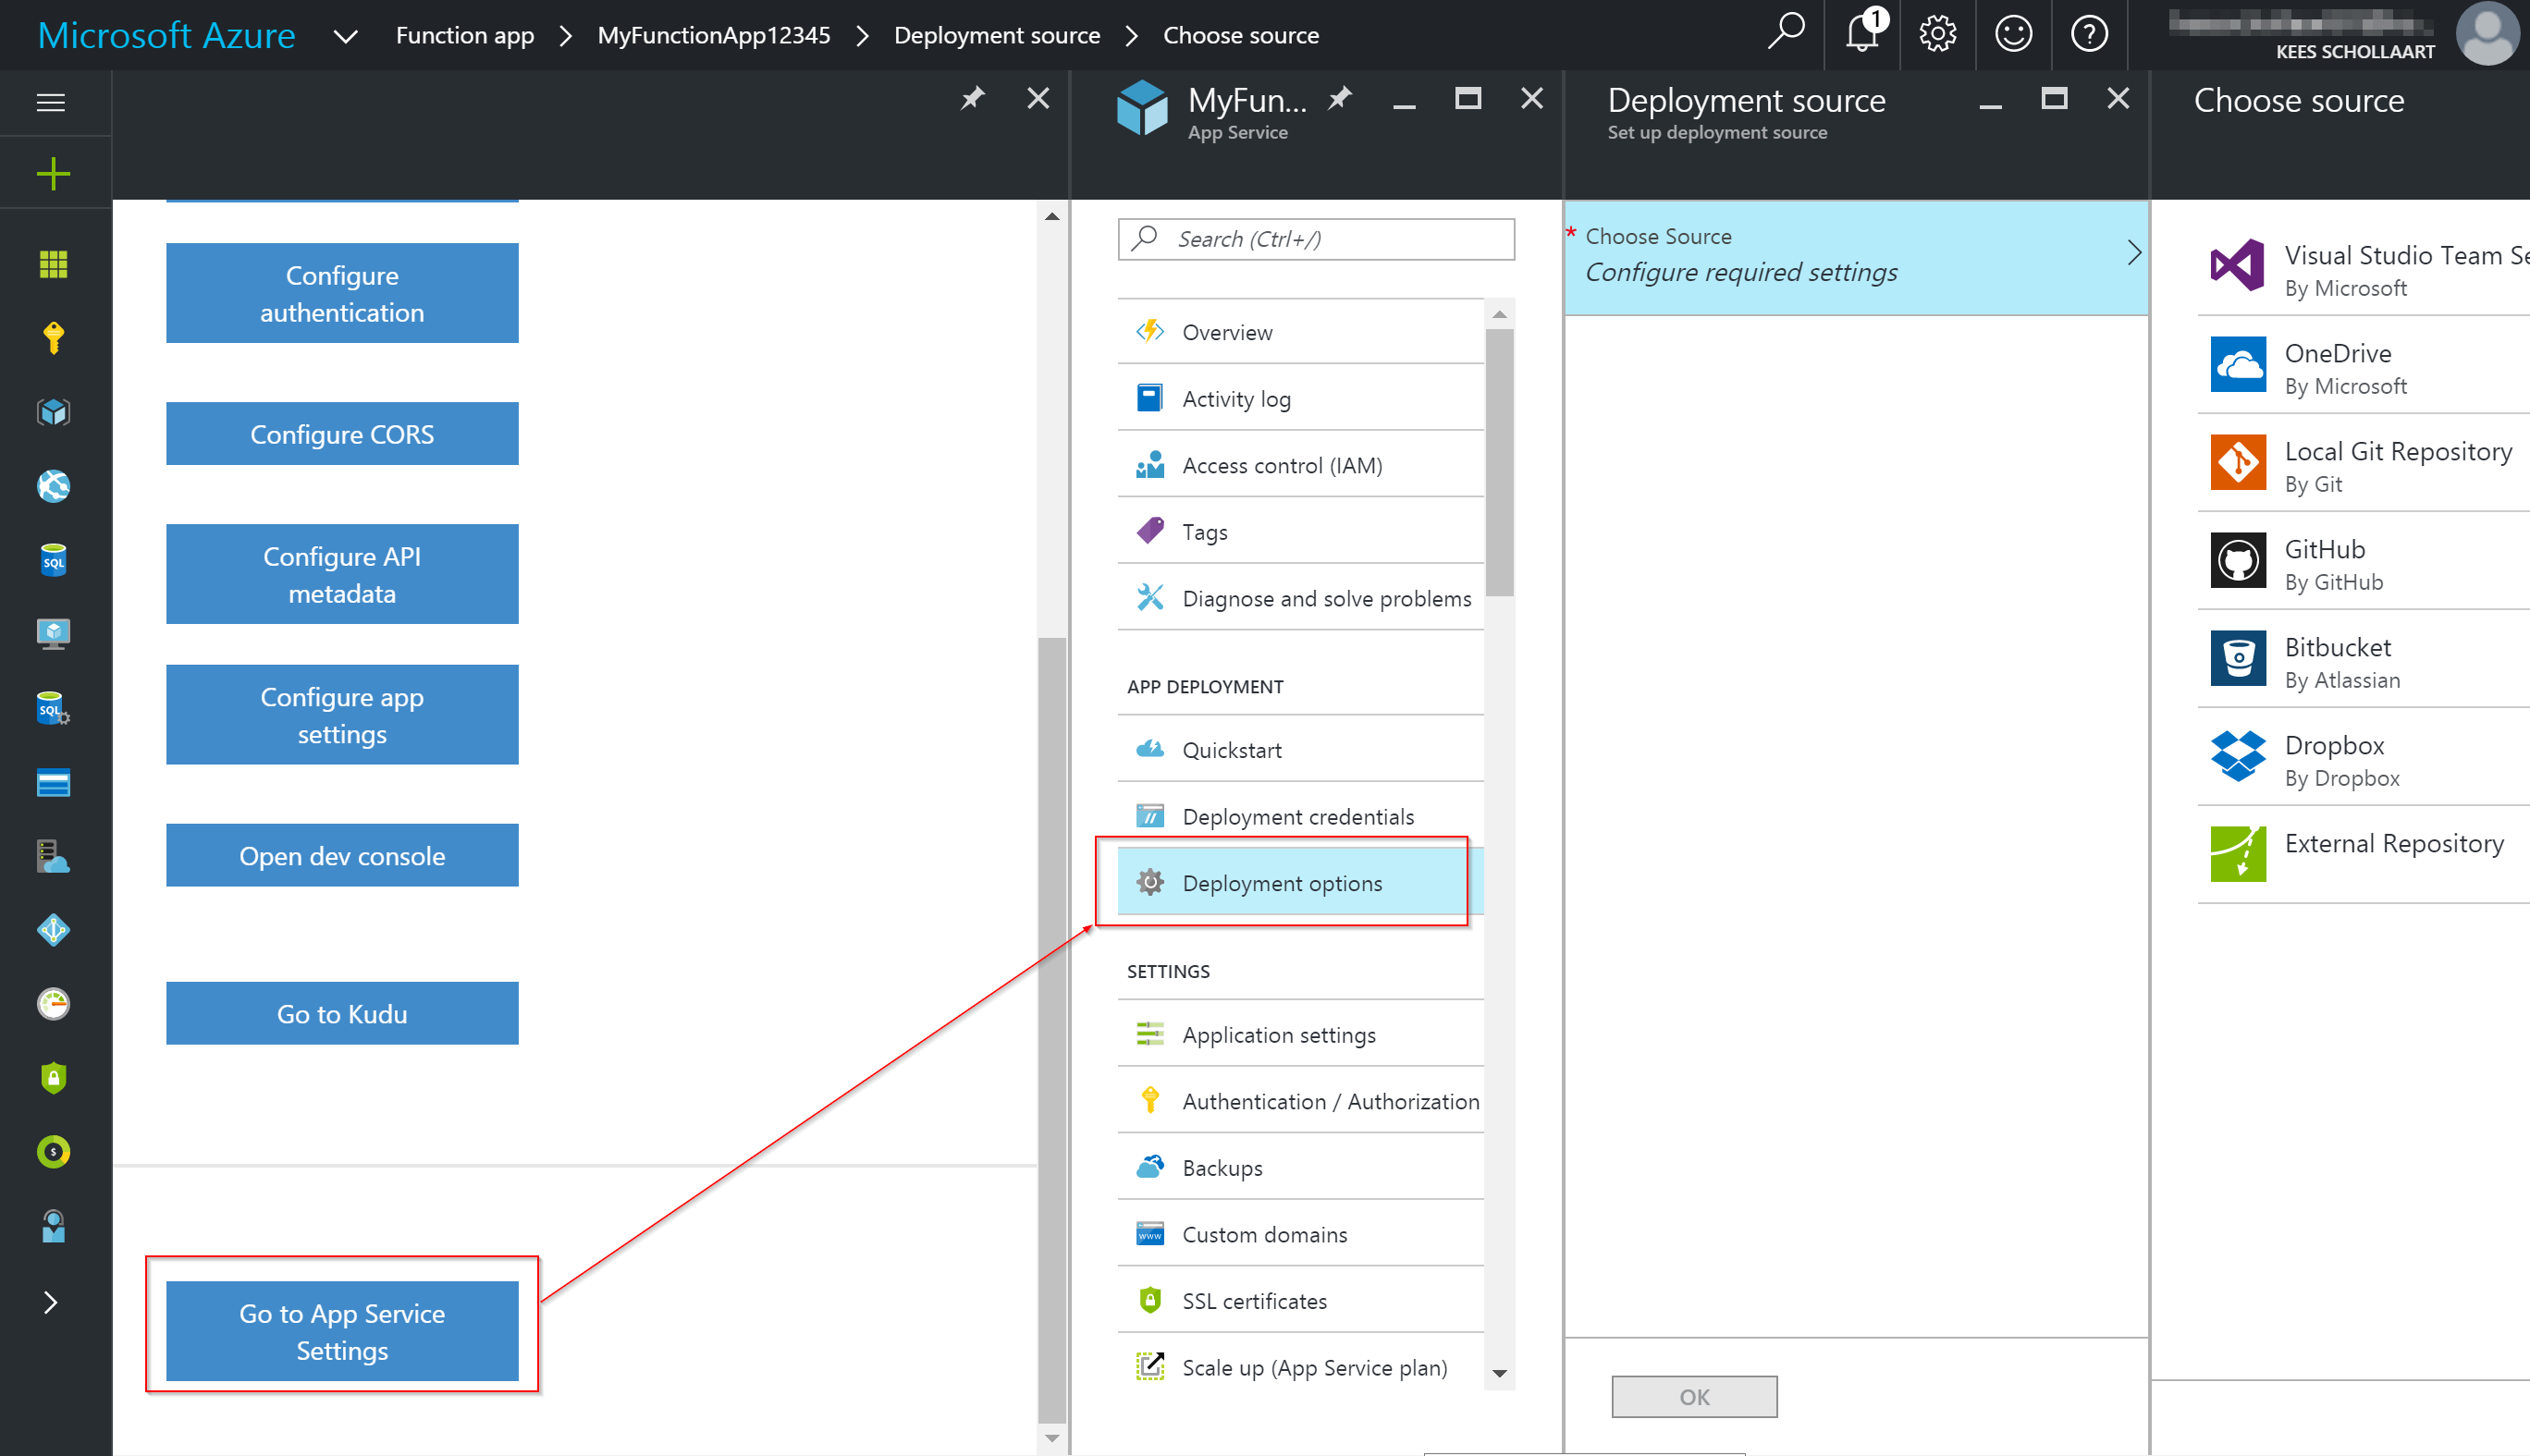
The problem with this is, it cannot be integrated with a mature release/deployment pipeline and it deploy’s after each code update in the connected repository.
Instead, what we want:
- Release and Deploy the Azure Function in the same manner as other solution’s (PaaS) components
- Have the Azure Function’s in (existing) ARM template
- Benefit from widely used and advanced deployment technologies
ARM Template
The first step is to include the Azure Function in the ARM Template. An Azure Function is a specialized kind of AppService.
Besides the snippet below, an Azure Function requires an additional storage account compared to a regular AppService, this storage account is not included in this snippet but is included in the example template.
{
	"type": "Microsoft.Web/sites",
	"kind": "functionapp",
	"name": "[variables('functionapp_name')]",
	"apiVersion": "2015-08-01",
	"location": "[resourceGroup().location]",
	"resources": [
	{
		"apiVersion": "2015-08-01",
		"name": "appsettings",
		"type": "config",
		"dependsOn": [ "[concat('Microsoft.Web/Sites/', variables('functionapp_name'))]" ],
		"properties": {
			"FUNCTIONS_EXTENSION_VERSION": "~0.6",

			"AzureWebJobsDashboard": "[variables('storage_connectionstring')",
			"AzureWebJobsStorage": "[variables('storage_connectionstring')",

			"Example_Custom_AppSetting": "..."
		}
	}]
}
Notice this AppService is of kind: "functionapp" and it has four special and required appsettings. You can add your own appsettings as well (Example_Custom_AppSetting), this can be useful when you need for example:
- Use ConnectionStrings in your functions to other resources in your ARM Template
- Use values/settings from your CI/CD flow via the ARM Template’s parameters
The ARM Template is available in the ARM Template in my example project on GitHub.
Visual Studio Project
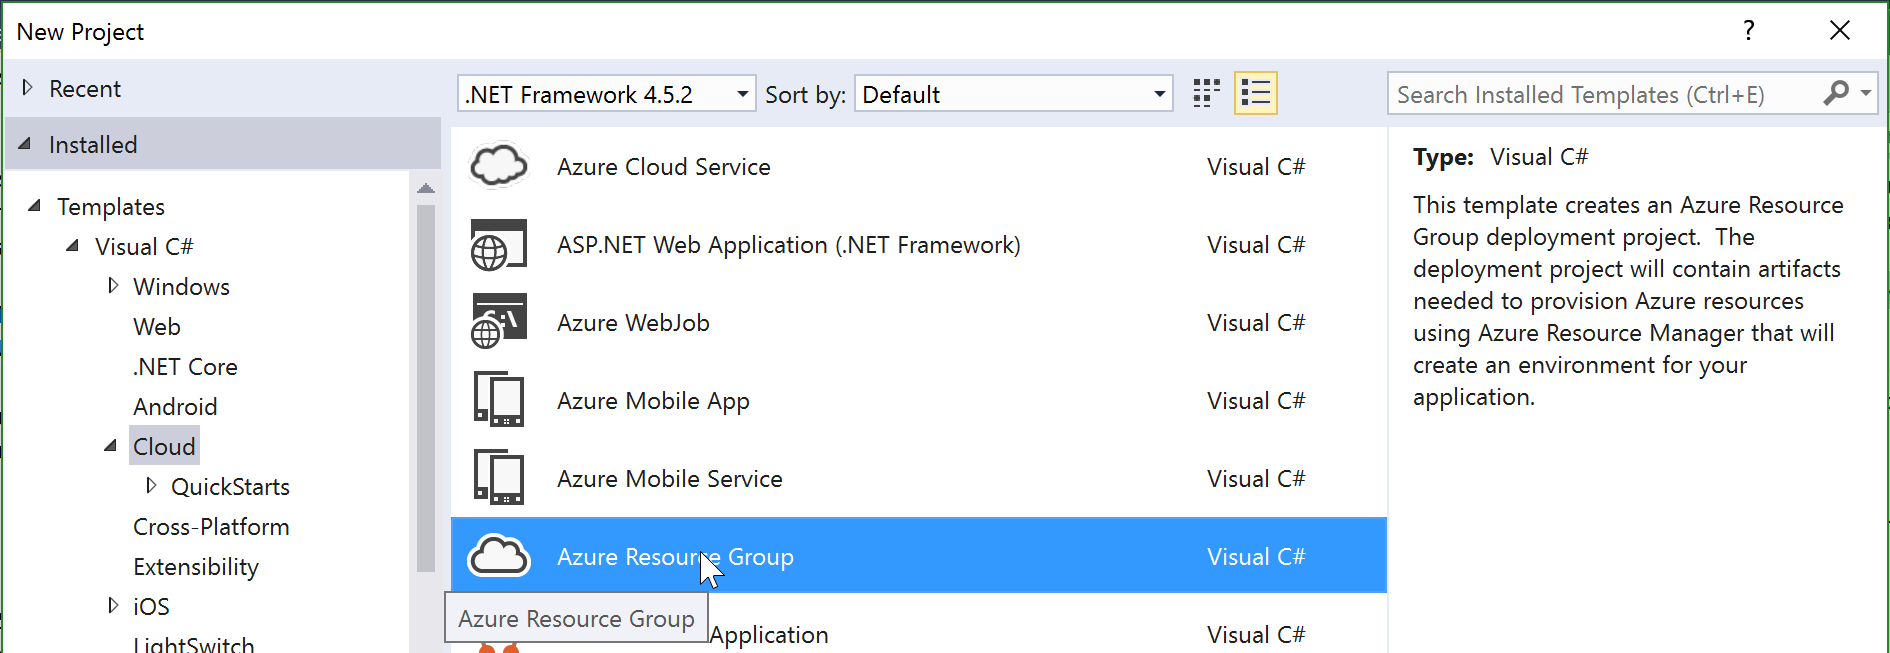
A Visual Studio solution/project (file) is not strictly required when you want to deploy an Azure Function. In this example I created a Visual Studio project of type ‘Resource Group Project’. This is because I like to work in Visual Studio and because (in my experience) functions are usually part of a bigger solution. But you can also host the template and Azure Function’s folder structure in your own source repository without the Visual Studio solution and project files.
My Visual Studio solution structure looks like this:
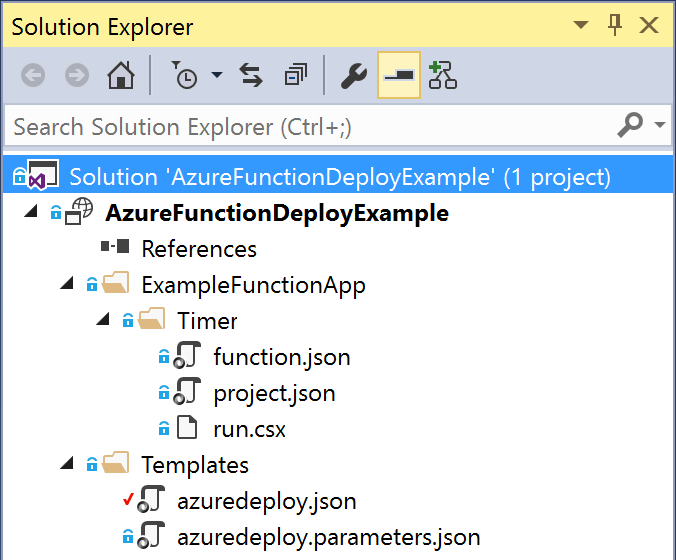
The ‘ExampleFunctionApp’ in the screenshot above maps to a single FunctionApp (as configured in the ARM Template before). Every subfolder (only ‘Timer’ in this case) is a function within the FunctionApp: a FunctionApp can contain multiple functions.
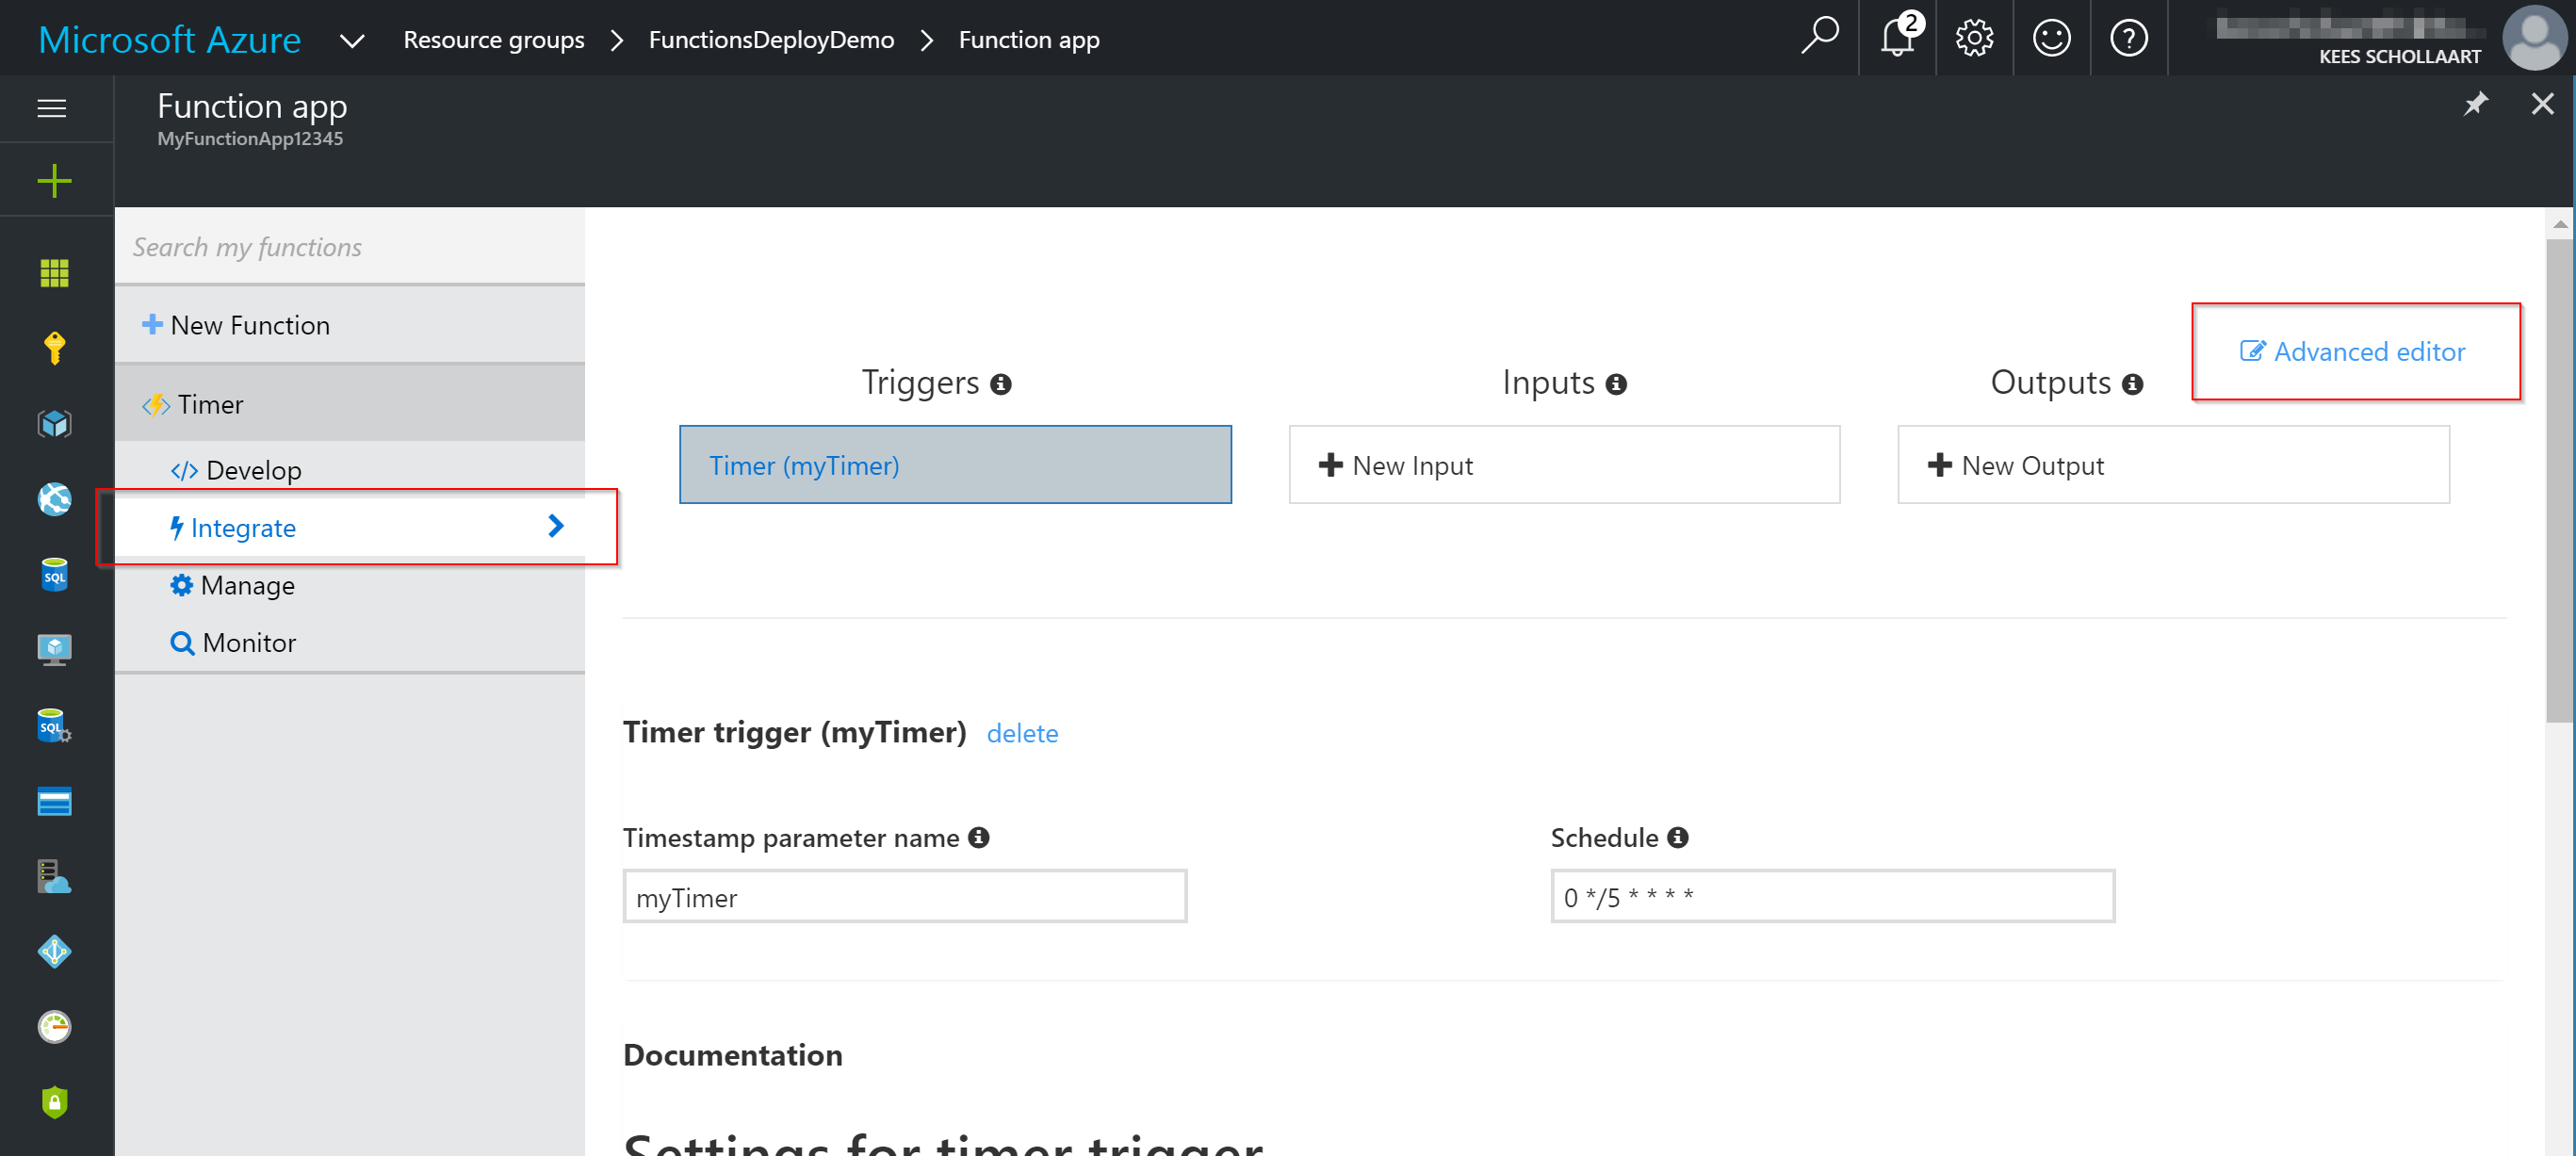
Every function consist of at least two files, let start with function.json. This file contains the configuration of the function. In the Azure Portal, this is the ‘Integrate’ tab when you edit your function, you can see the underlying JSON in the Azure Portal by clicking on ‘Advanced Editor’ in the top-right corner.

The run.csx file is your Azure Function’s entry point and contains the C# code of your function.
If you’re using NuGet packages or do other advanced stuff, you might need and addition third file: the project.json file. I included one in my example project for reference.
When we look in the AppService’s underlying filestructure using Kudu, it’s important to understand that each function (not FunctionApp) has it own folder in the /site/wwwroot/ folder. In my example the /site/wwwroot/ has it’s one folder: ‘Timer’, in this ‘Timer’ folder are my function’s three files.
Deployment alternatives
In the next two chapters I will use Visual Studio Team Services to deploy my Azure Function but you can deploy using other systems as well:
- The ARM Template can be deployed using PowerShell, the Azure CLI, etc.
- The Azure function can be deployed using all Azure’s AppService deployments options.
VSTS Build
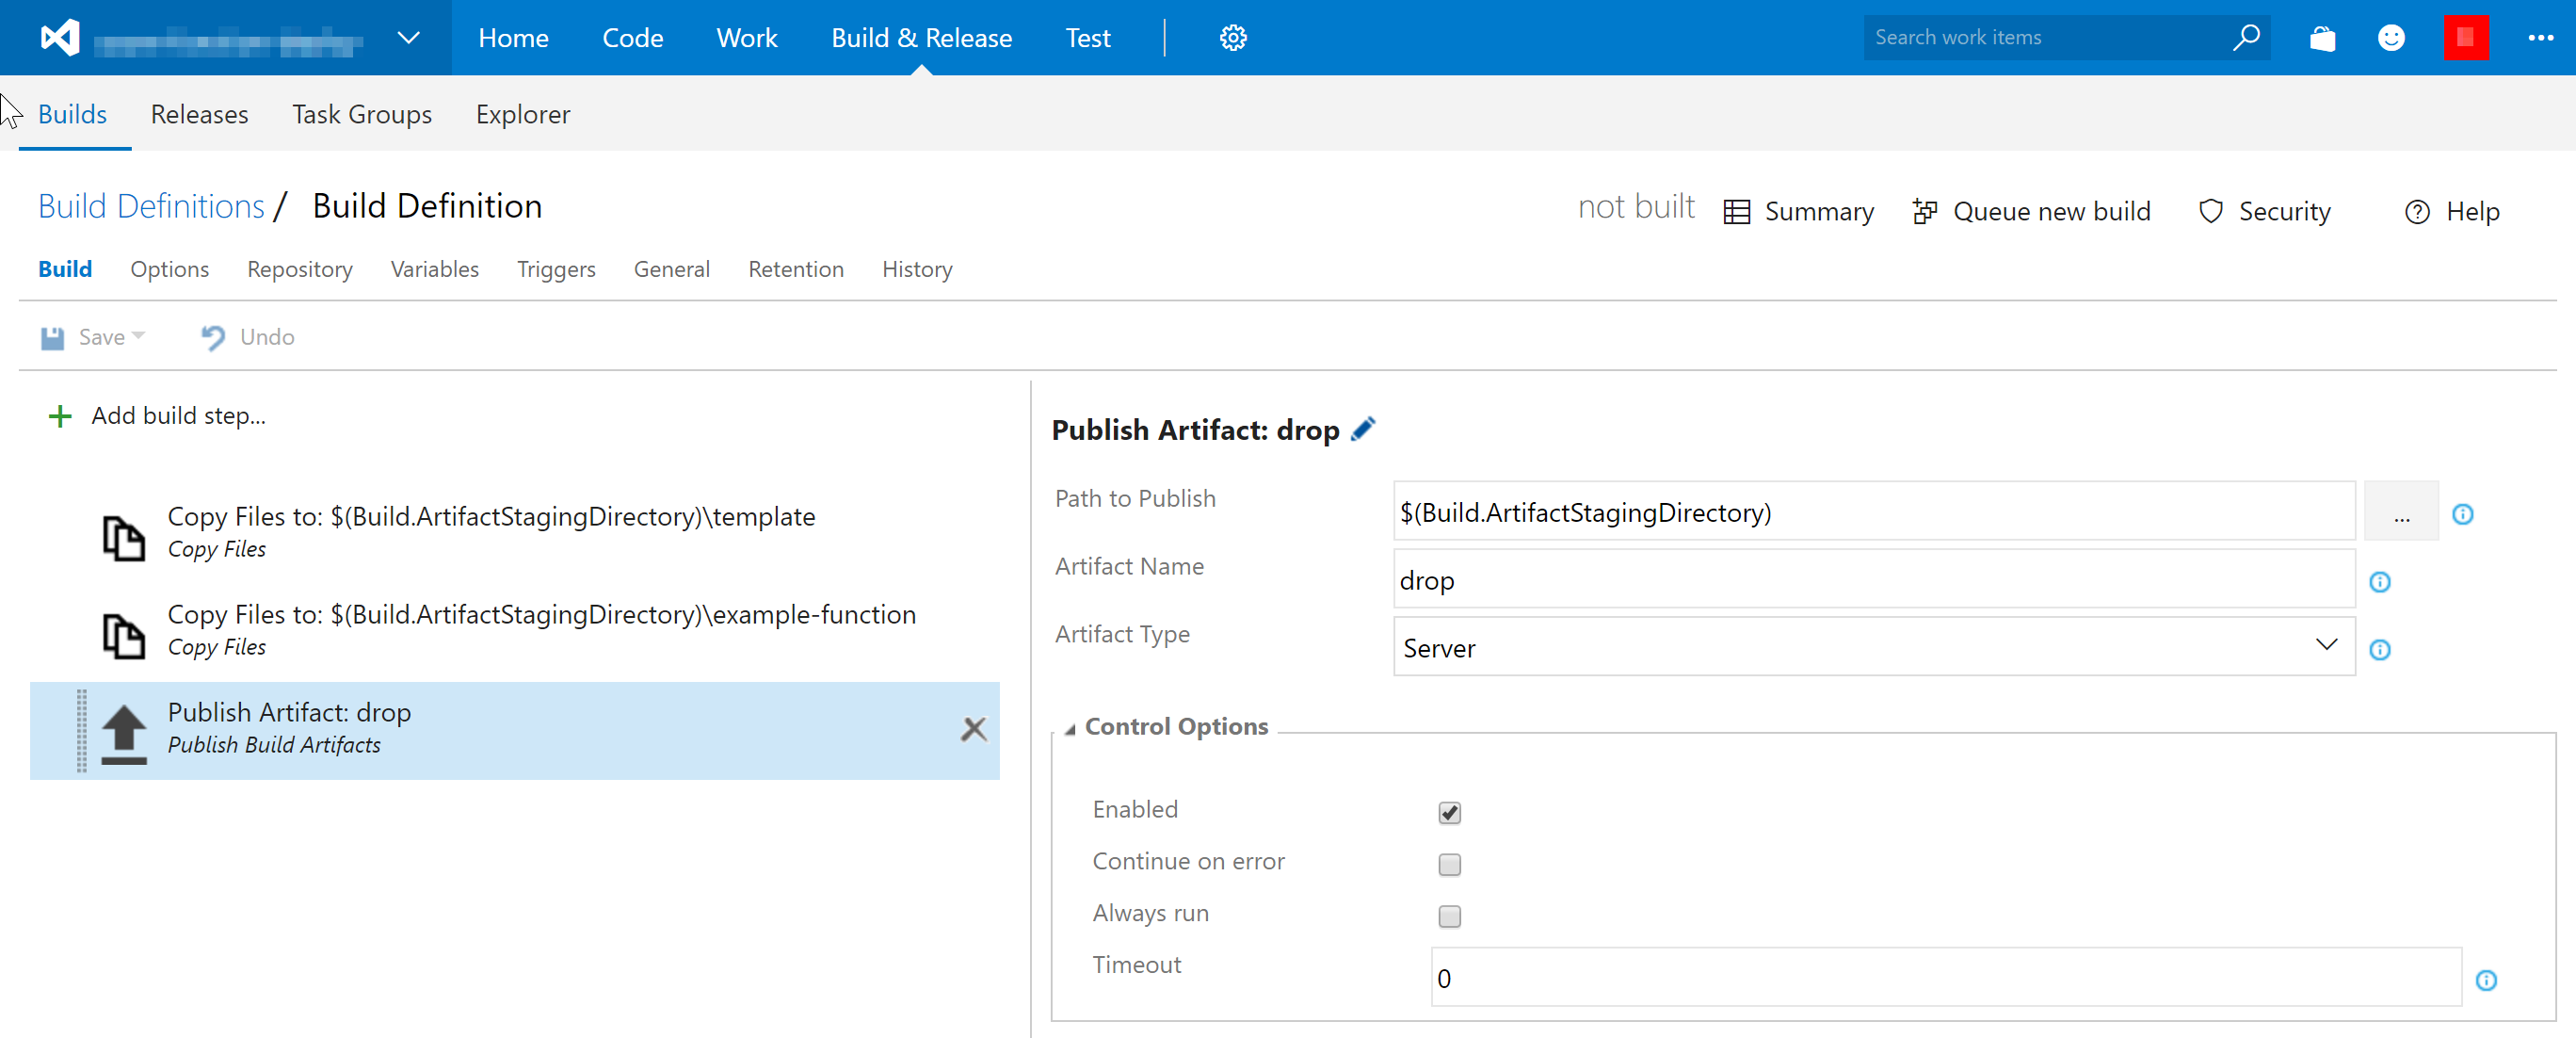
In the VSTS Build Definition, we copy/deploy all the files to the drop folder, in this way, we can use this files in our Release Definition later.
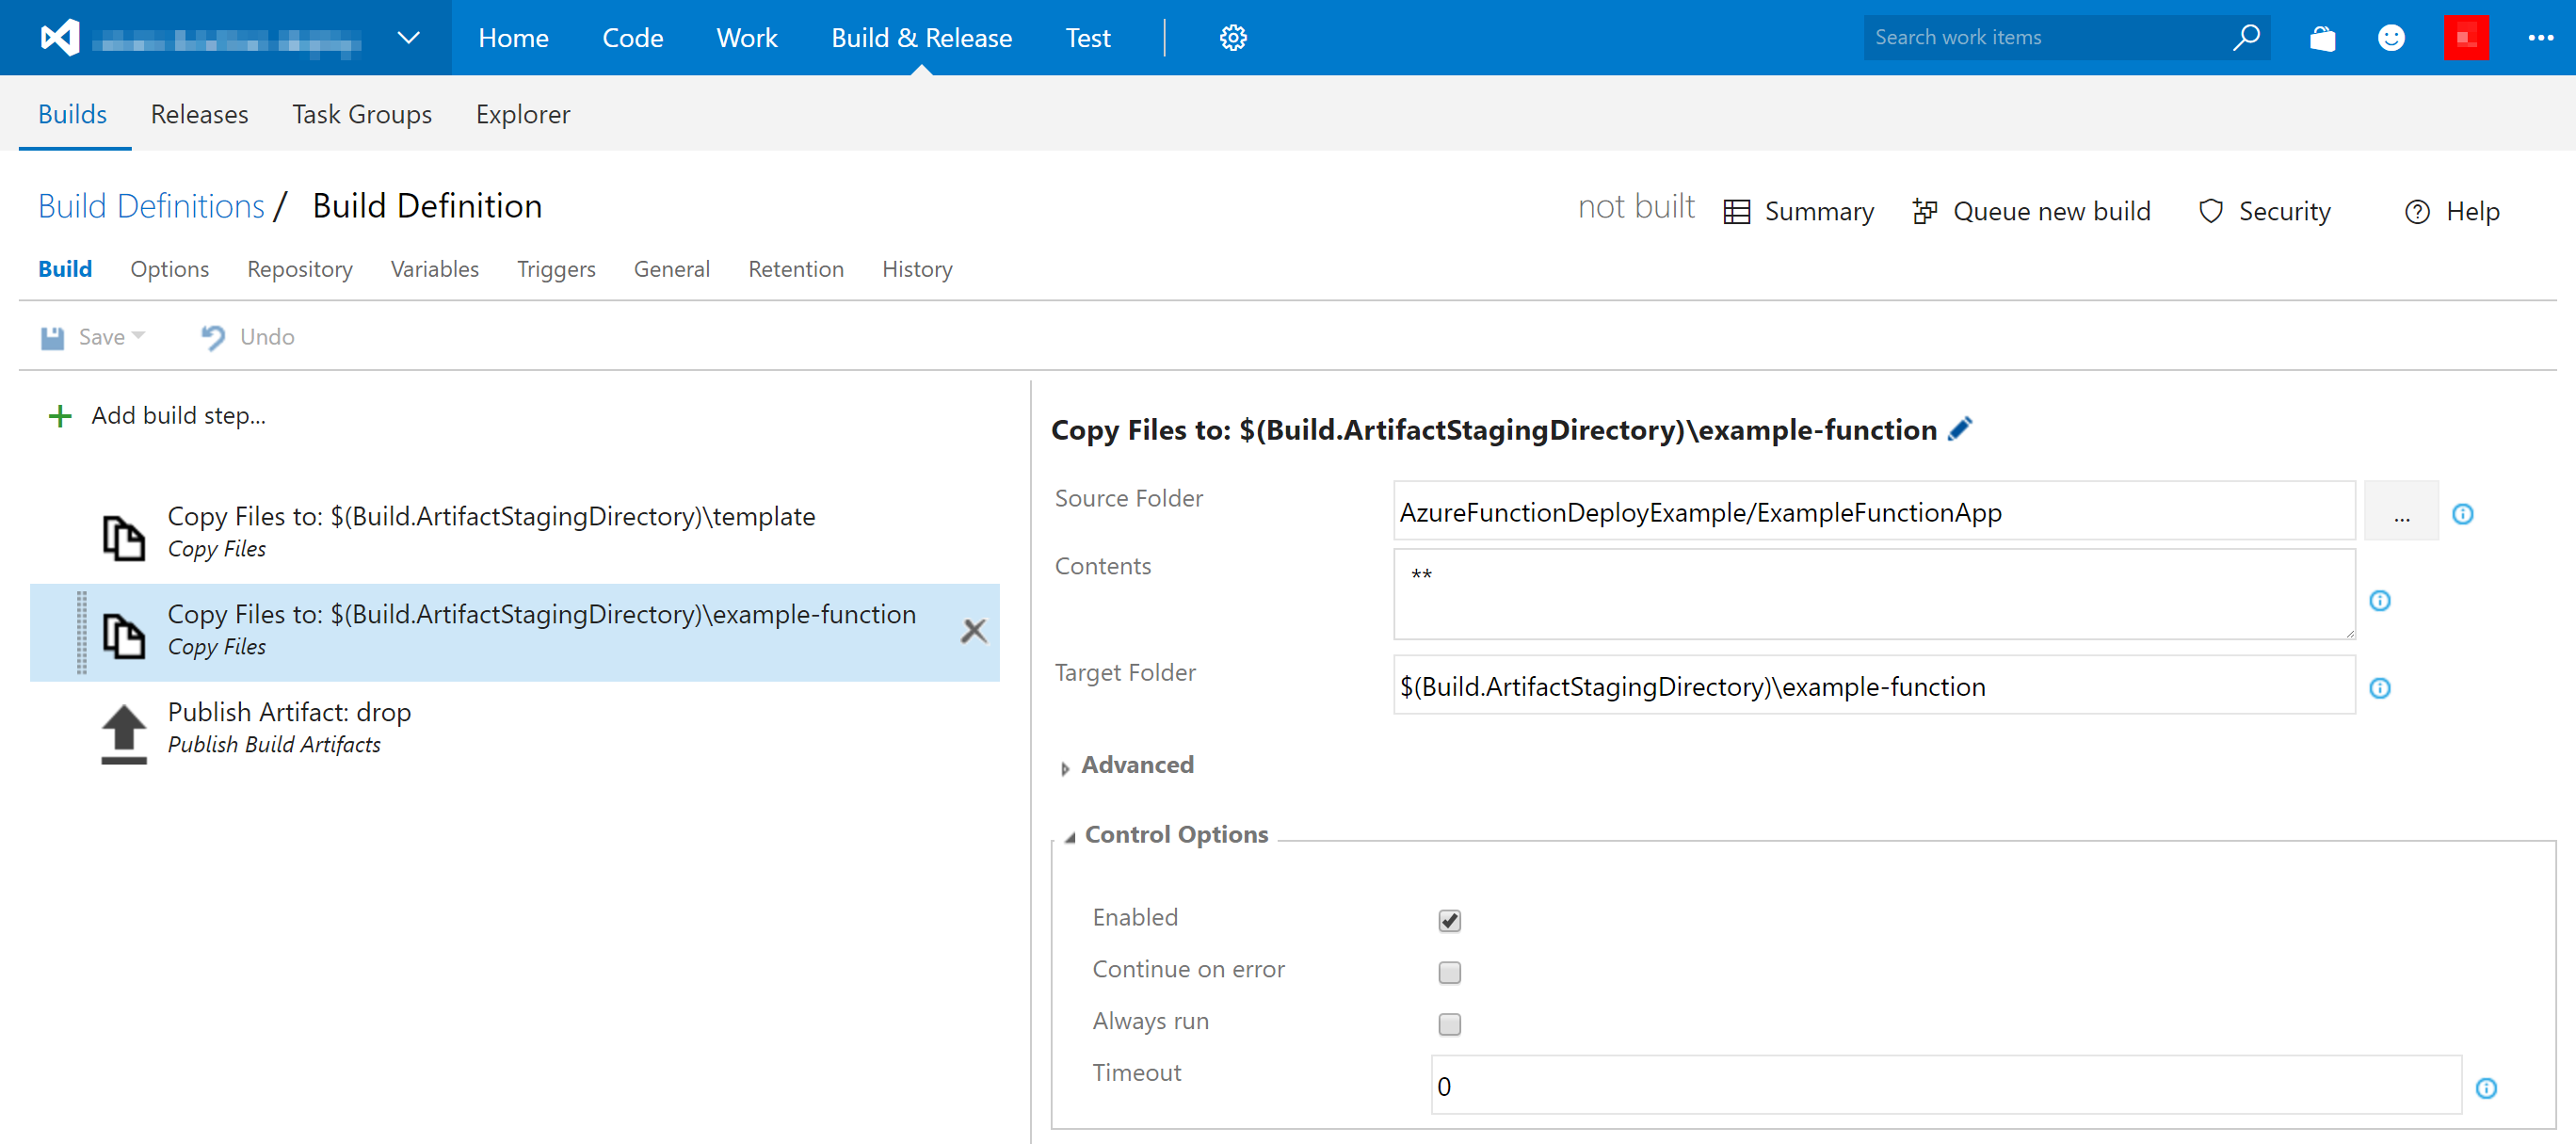
- Add two ‘Copy Files’ build steps
- In the first step, copy the contents of the ‘Templates’ folder to the
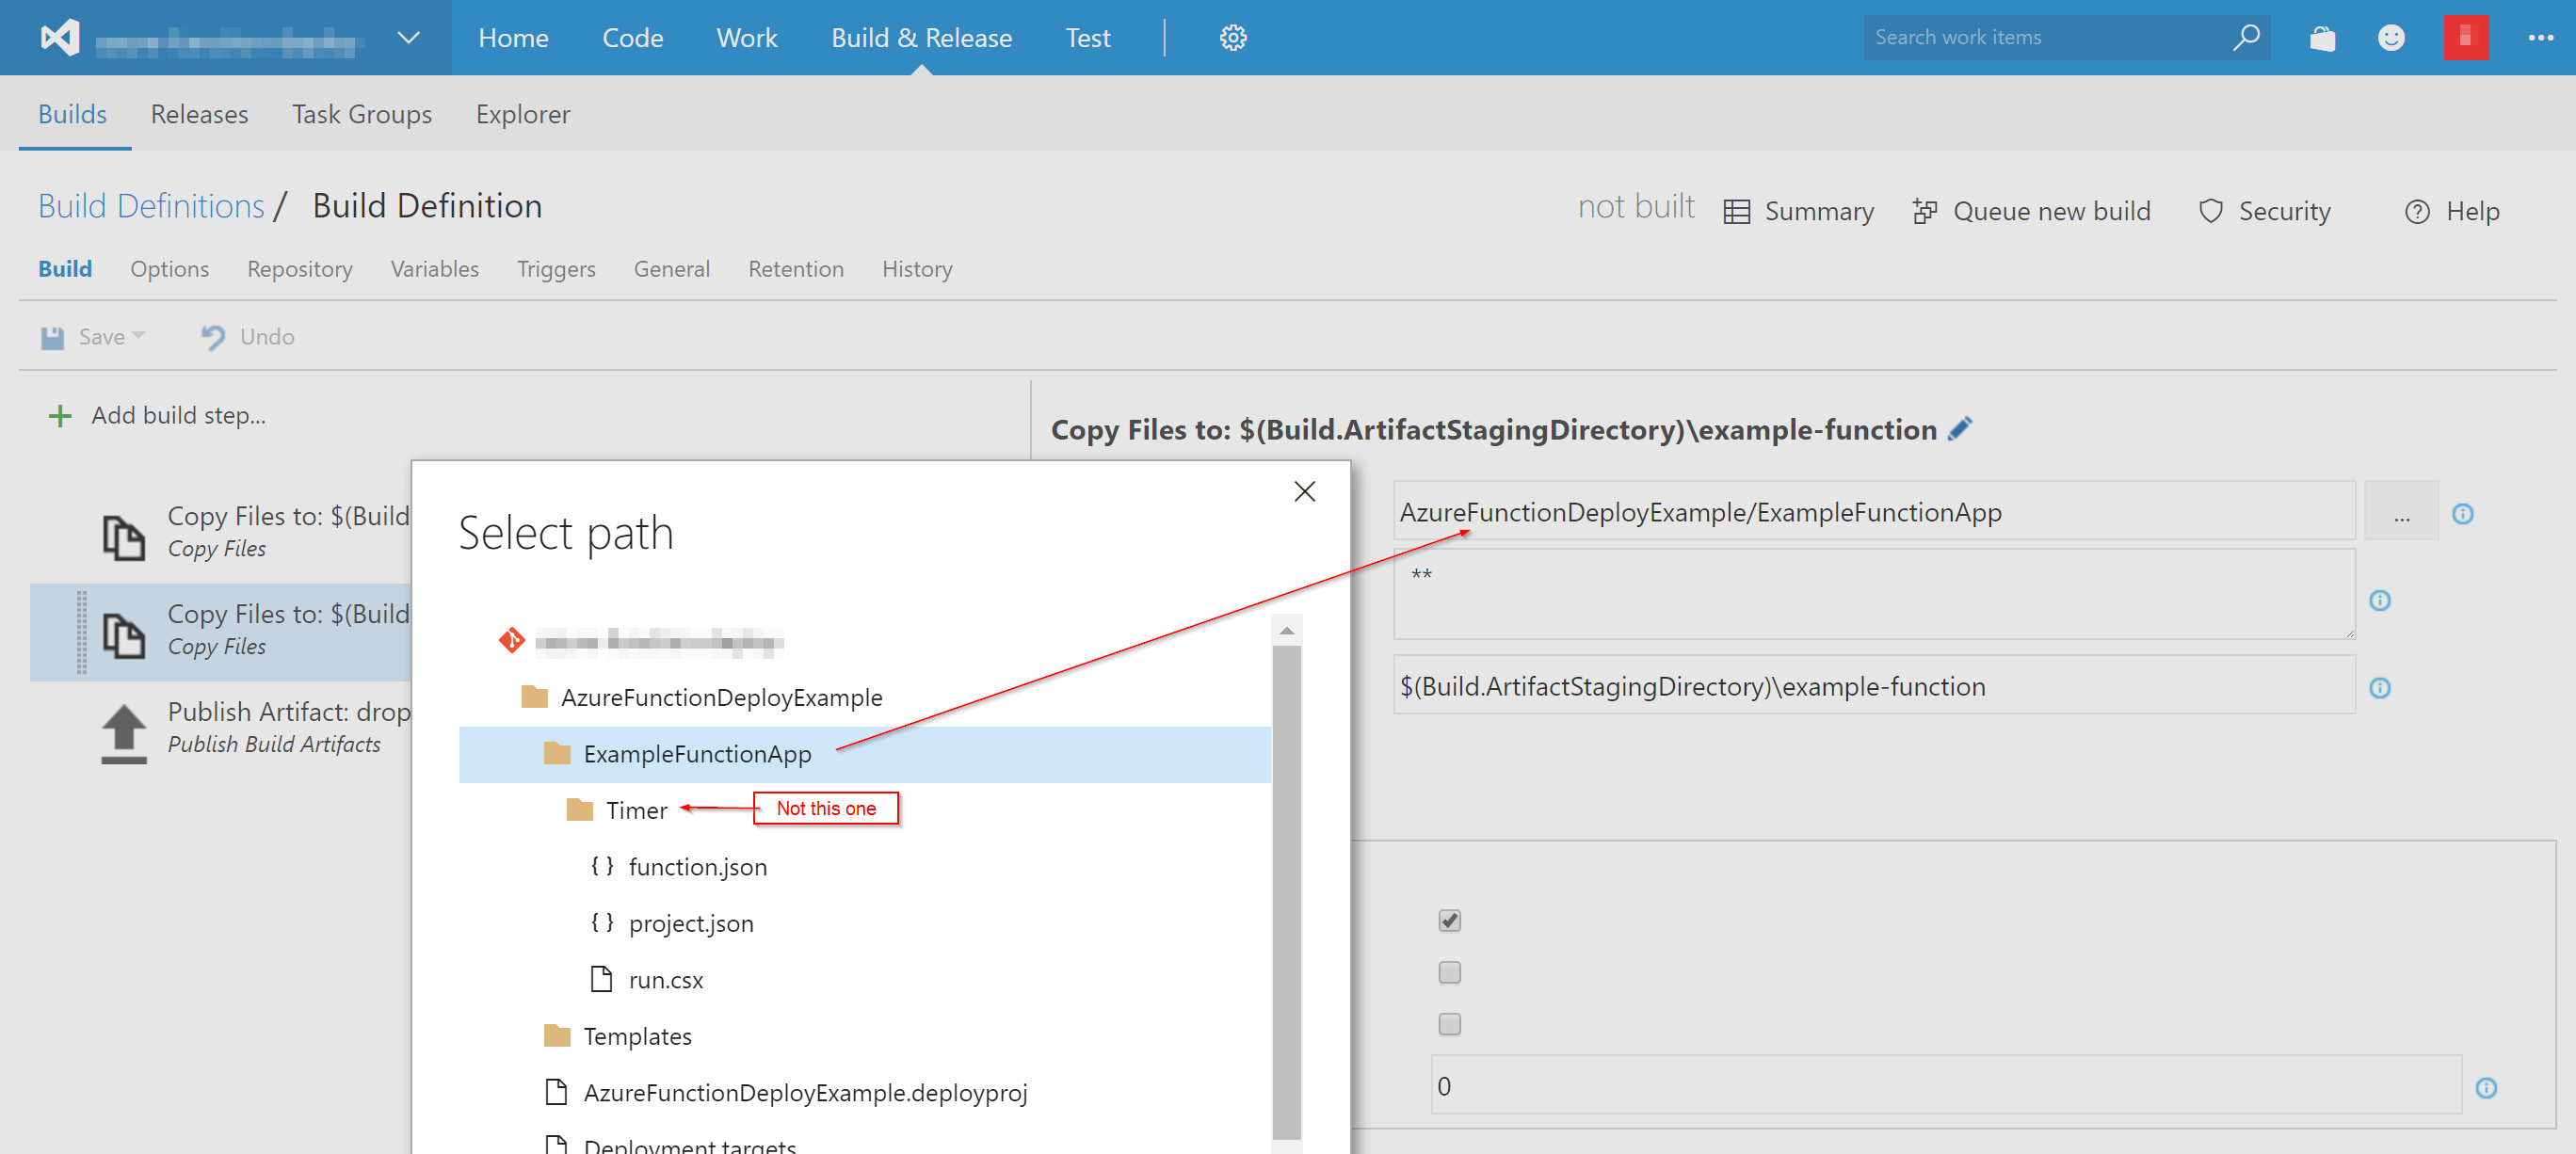
$(Build.ArtifactStagingDirectory)\templatestaging directory - In the second step, copy the contents of the FunctionApp to the
$(Build.ArtifactStagingDirectory)\example-functionstaging directory. The UI can be a little too helpful in the directory-picker, do not select the deepest level in the directory tree (see 3th screenshot).
Now start a build and confirm that it completes succesfully.

VSTS Release
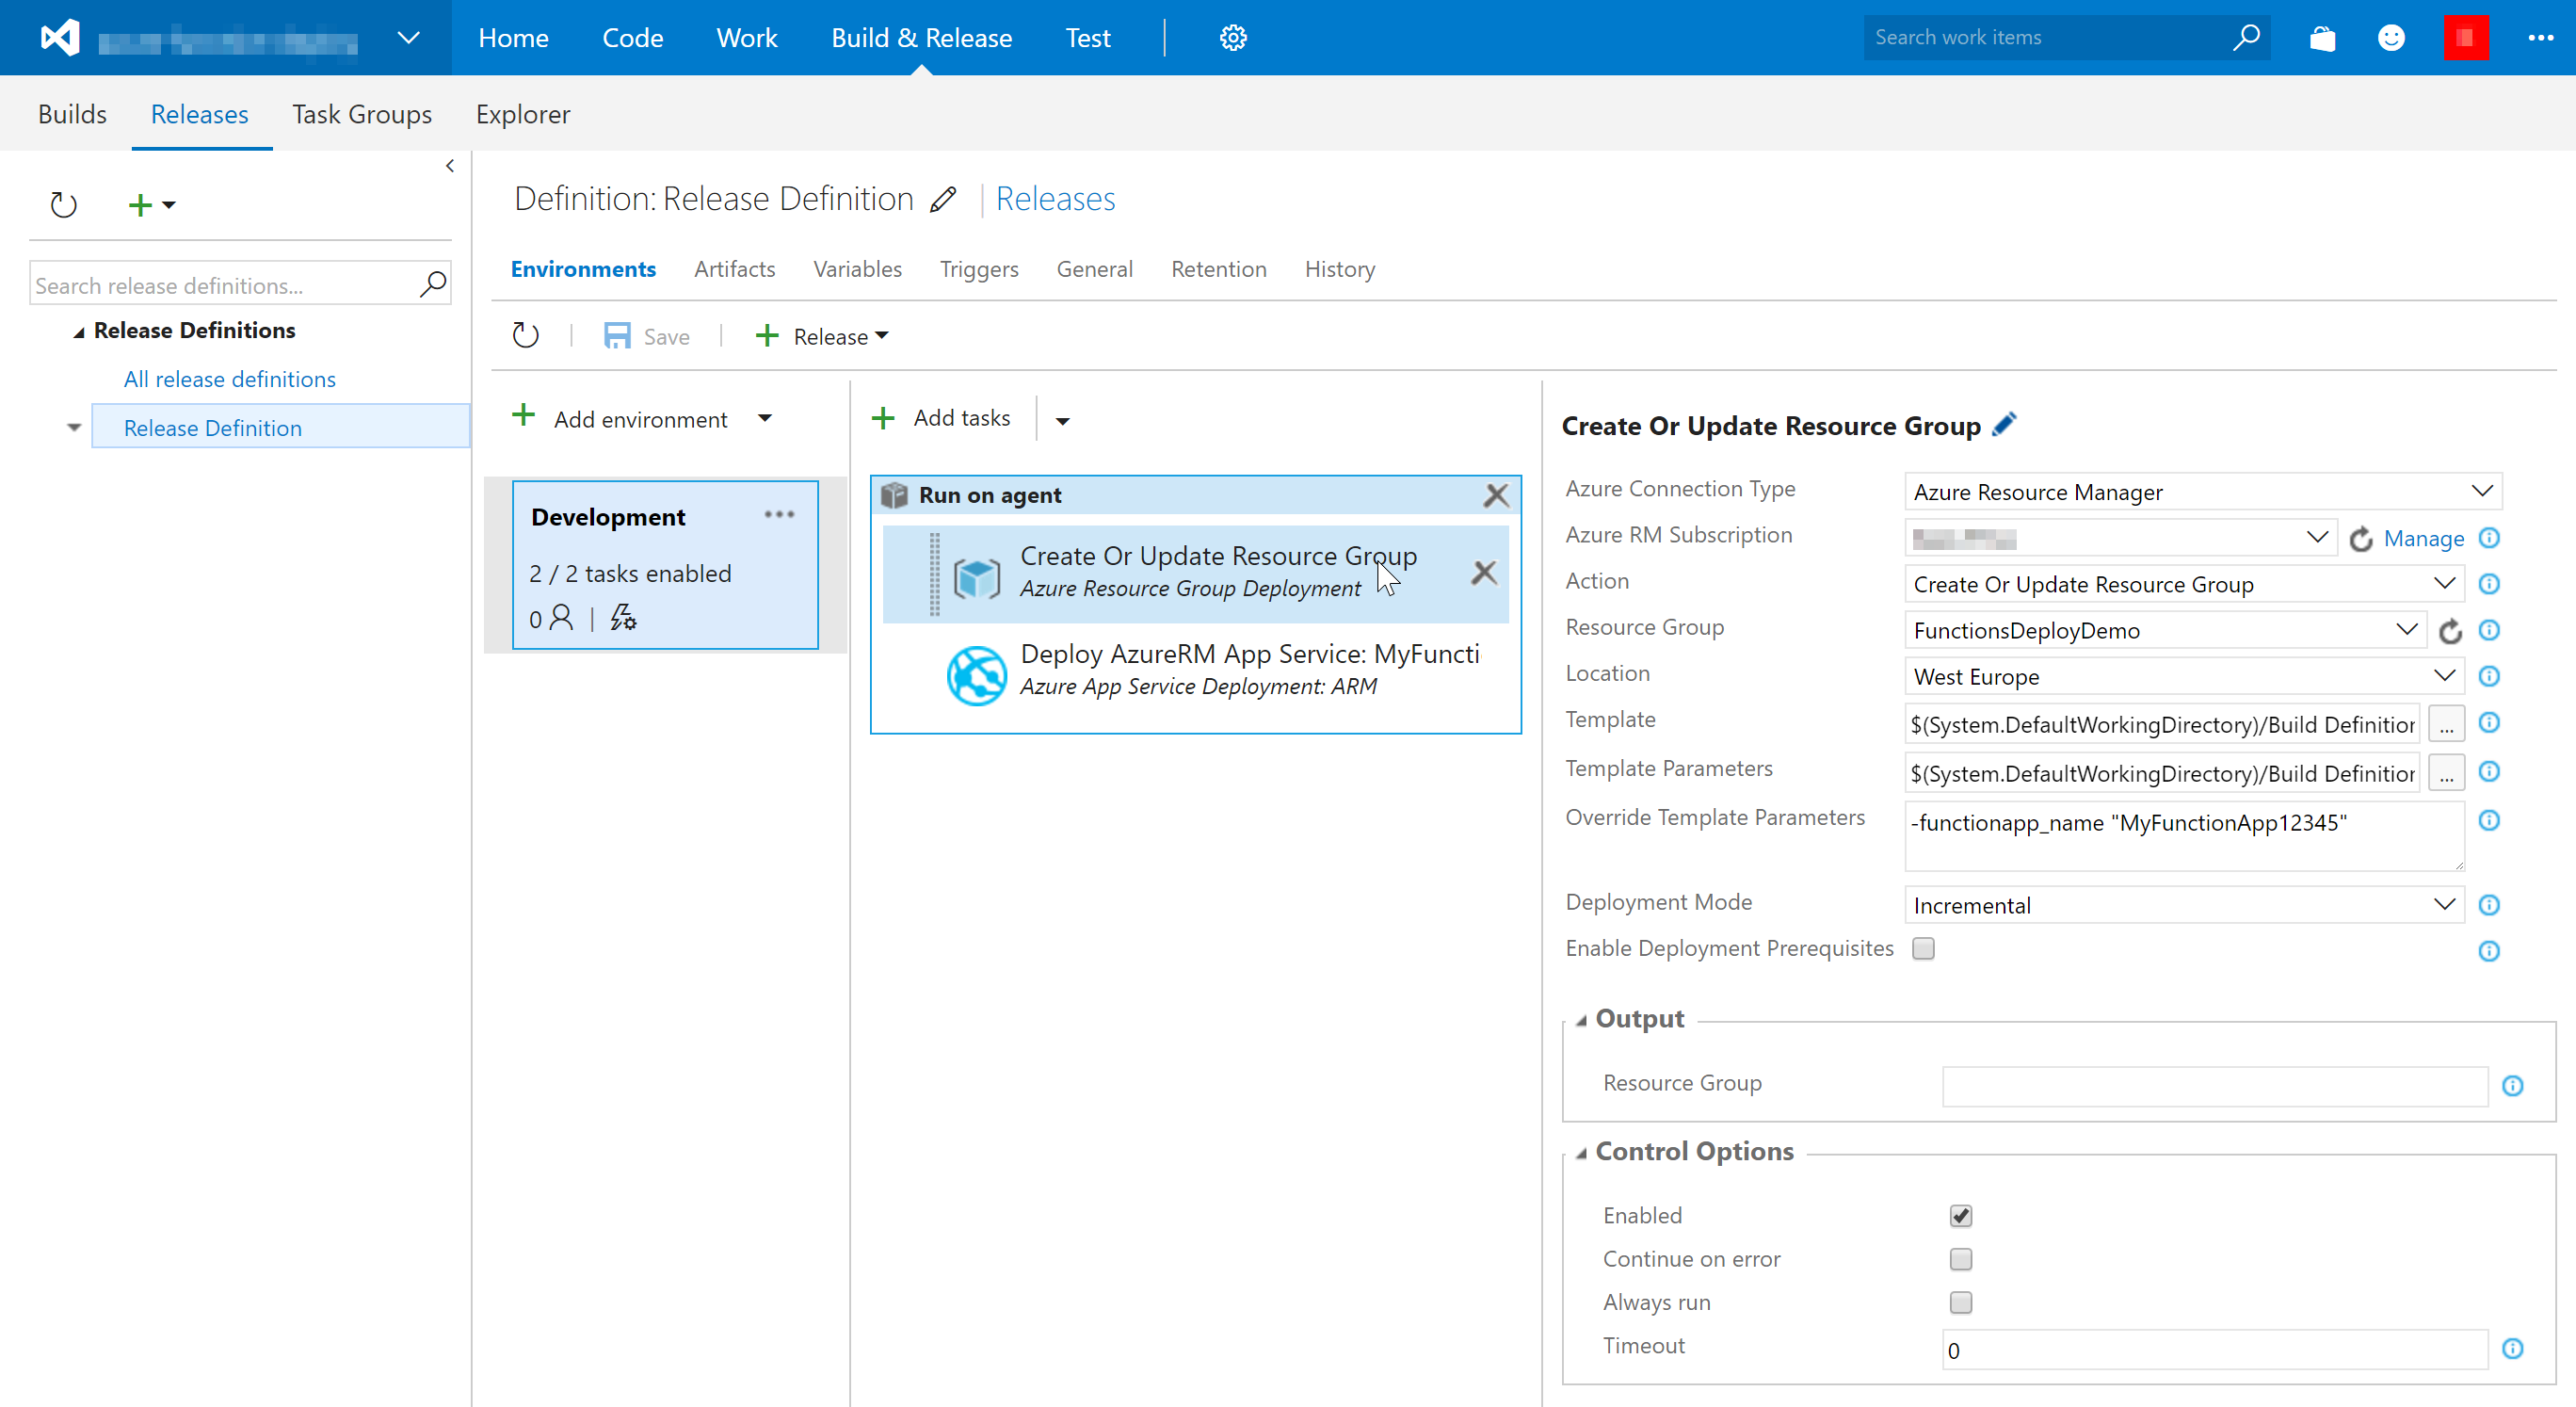
In the VSTS Release Definition, add two tasks: ‘Azure Resource Group Deployment’ and ‘Azure App Service Deployment: ARM’.
To configure the first step, you are required to have VSTS connected to an Azure AD/Subscription. I will not go into the details because there are some in-depth how-to’s on this already at MSDN and VisualStudio.com.
In the first step, type or select your action, resource group and location, then select your template and template.parameters files.
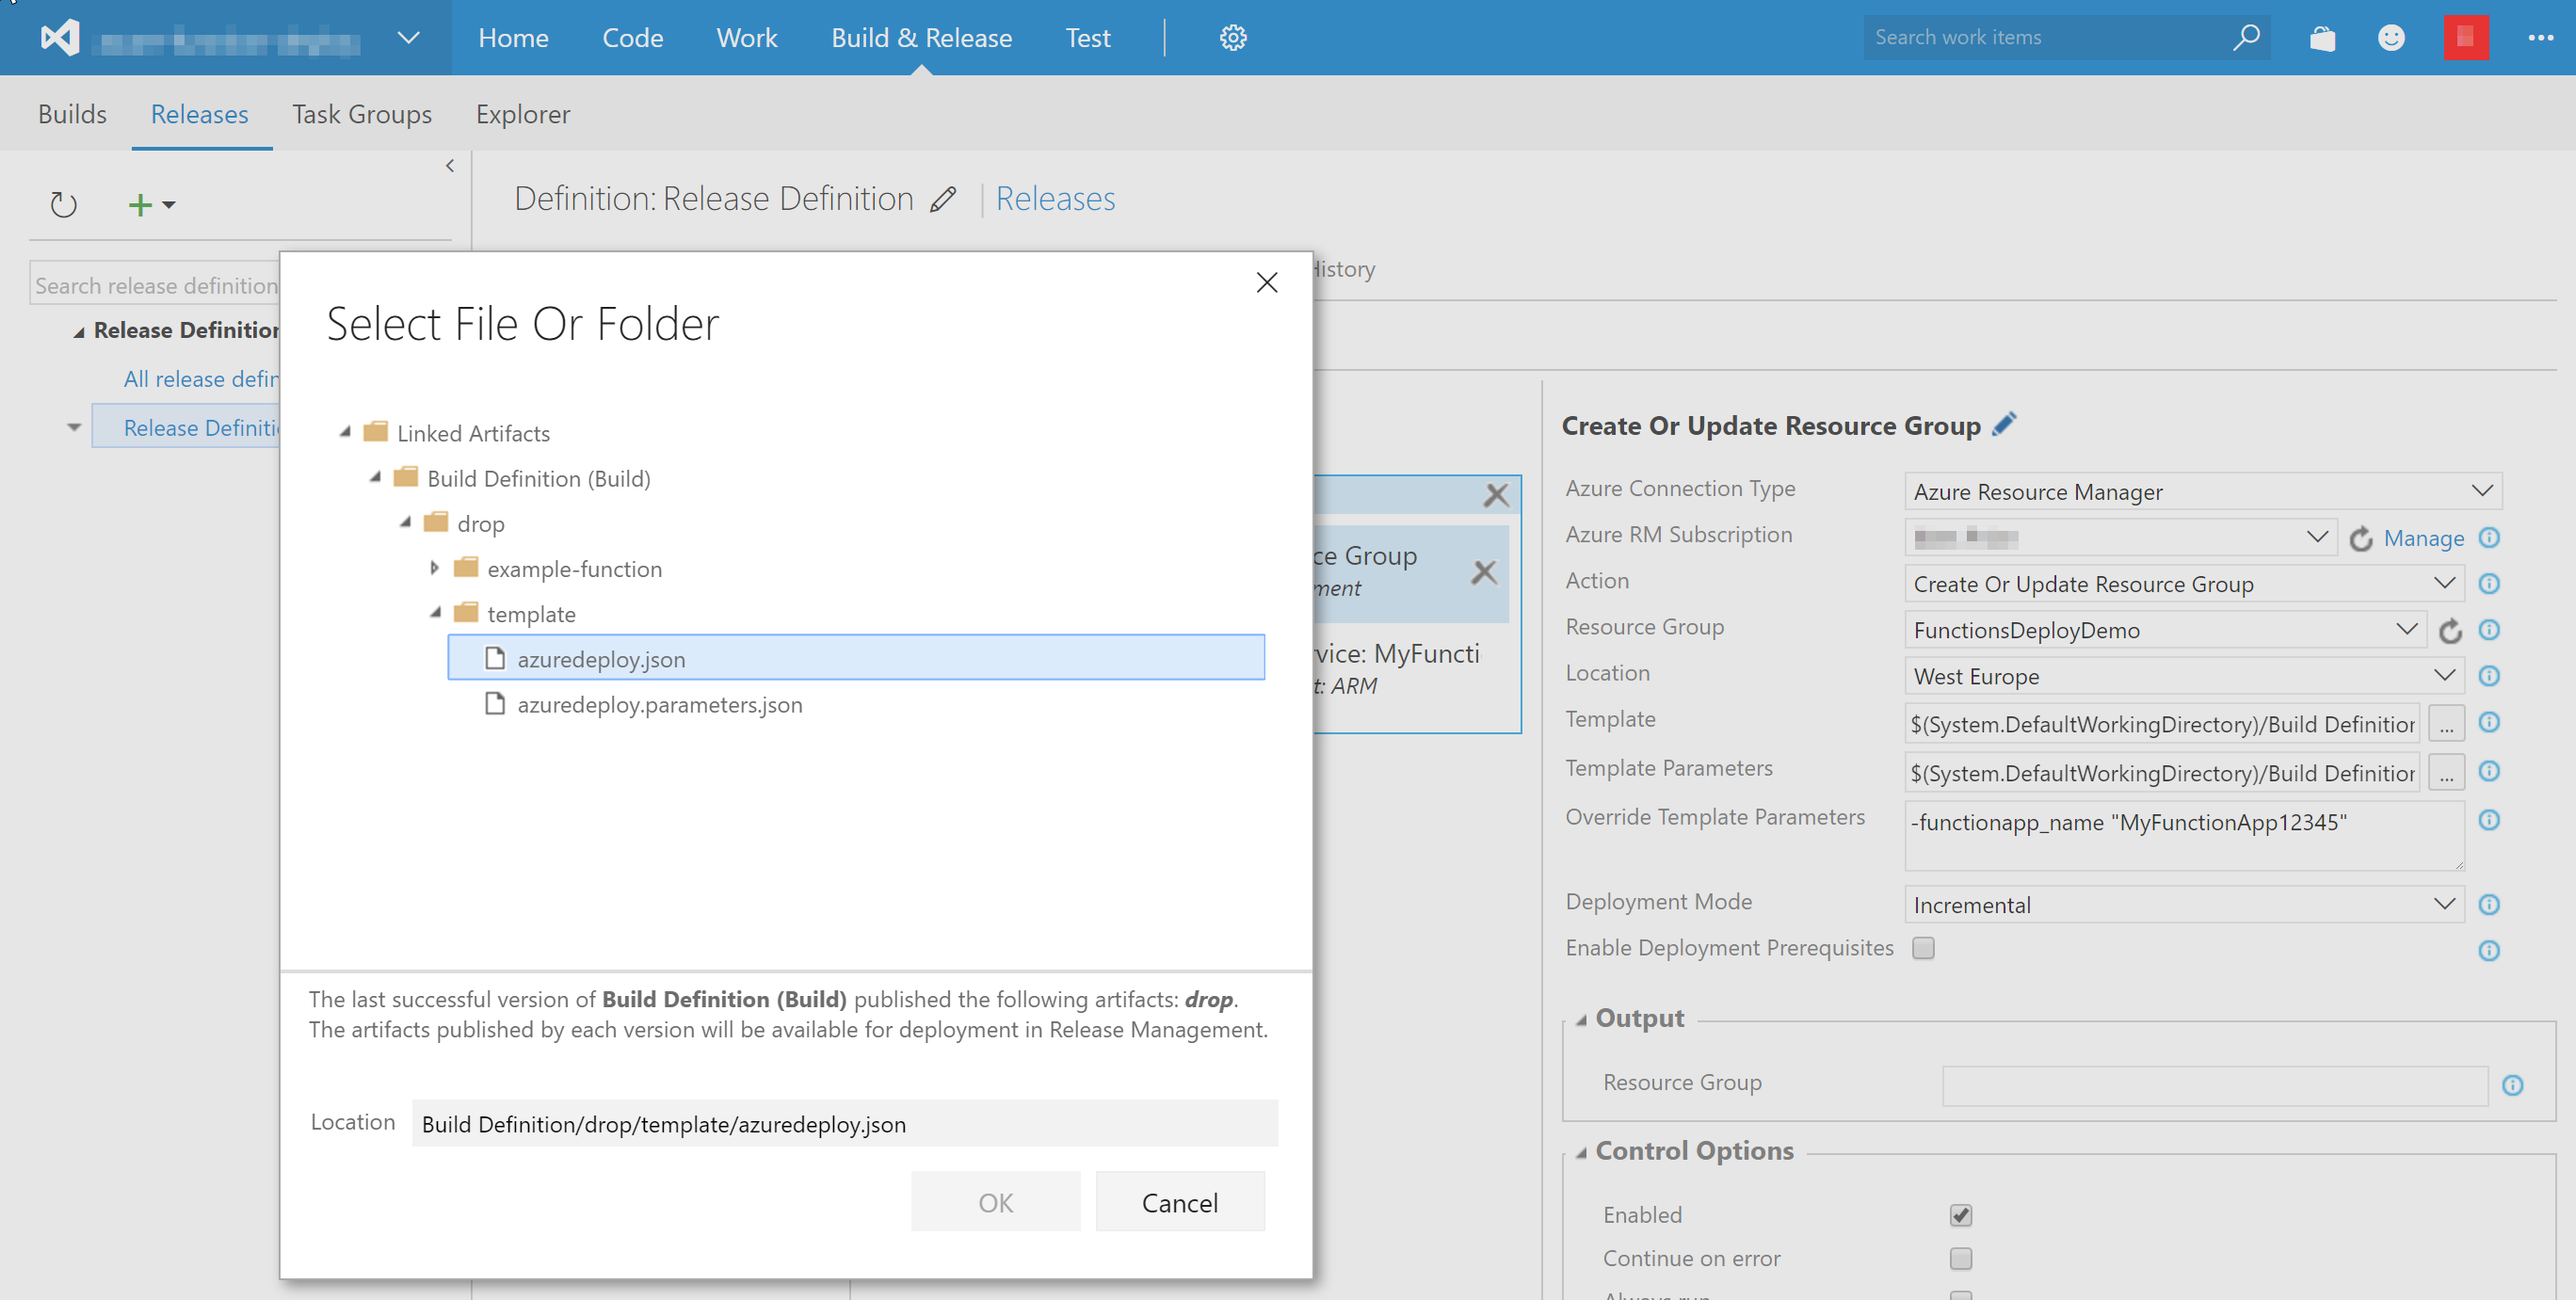
In my example, I have parameterized my ARM Template to set the name of the FunctionApp’s, in the ‘Override Template Parameters’ field, the value for this parameter can be ‘injected’. In my case the name of the ARM Template parameter is ‘functionapp_name’ so the value of the ‘Override Template Parameters’ field is: -functionapp_name "MyFunctionApp12345"
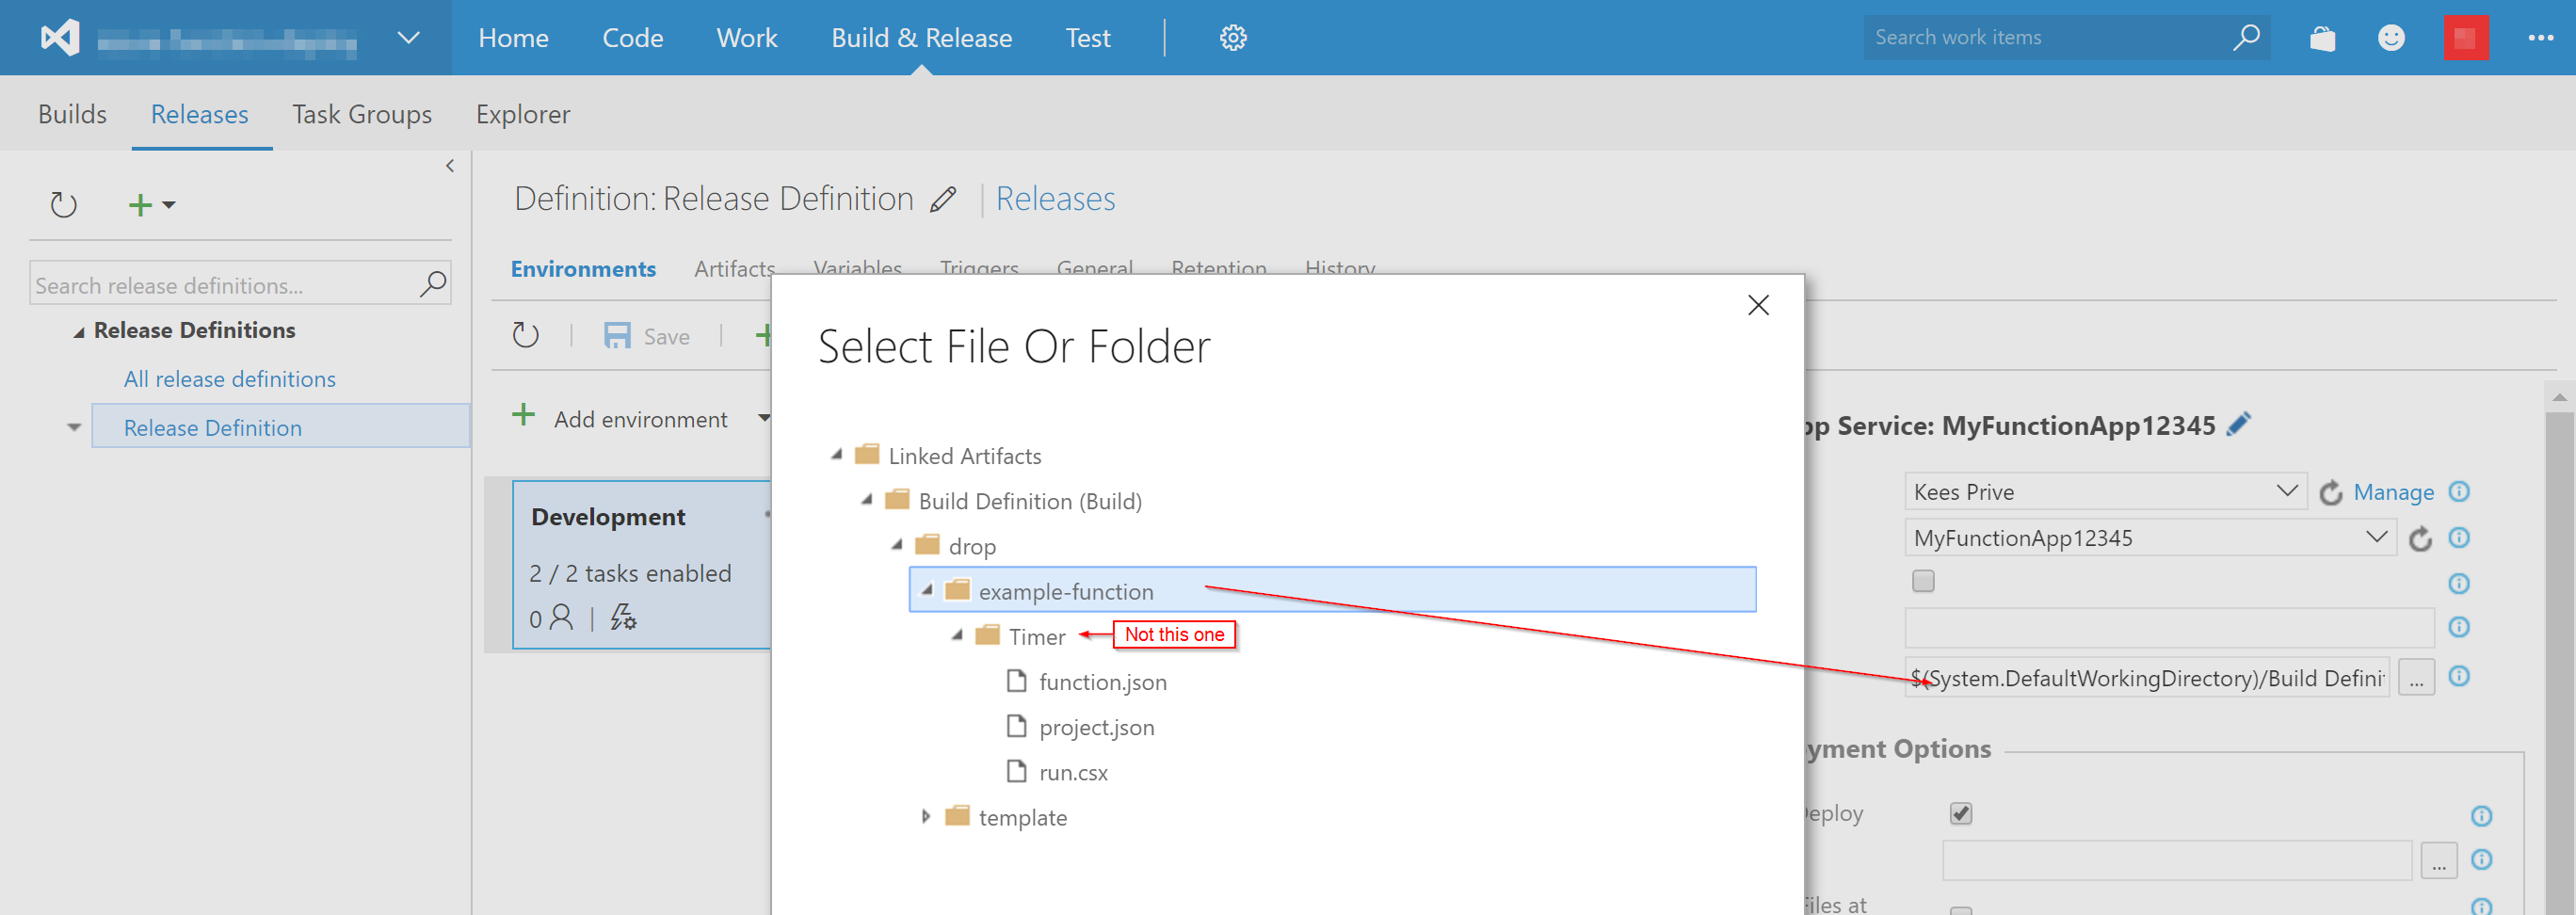
In the second task, we have to select the Subscription again. In the ‘App Service Name’ field, we have to provide the name of the FunctionApp. In my example this has to match the parameterized ARM Template value from the previous step (‘MyFunctionApp12345’). The first time you deploy your function, the combobox does not populate your AppServices name, just type the name.
The ‘Package or Folder’ provides you a … directory picker, select the folder FunctionApp’s folder containing your functions.
Make sure the ‘Publish using Web Deploy’ checkbox in checked.
Now create a release and see if your Azure Function will be deployed!
The result / code
![]() All code used for this blog is available at GitHub.
All code used for this blog is available at GitHub.
