Serverless AI in my backyard
Recently I added some cool stuff to my home automation platform using computer vision, serverless code and MQTT.
The ‘problem’
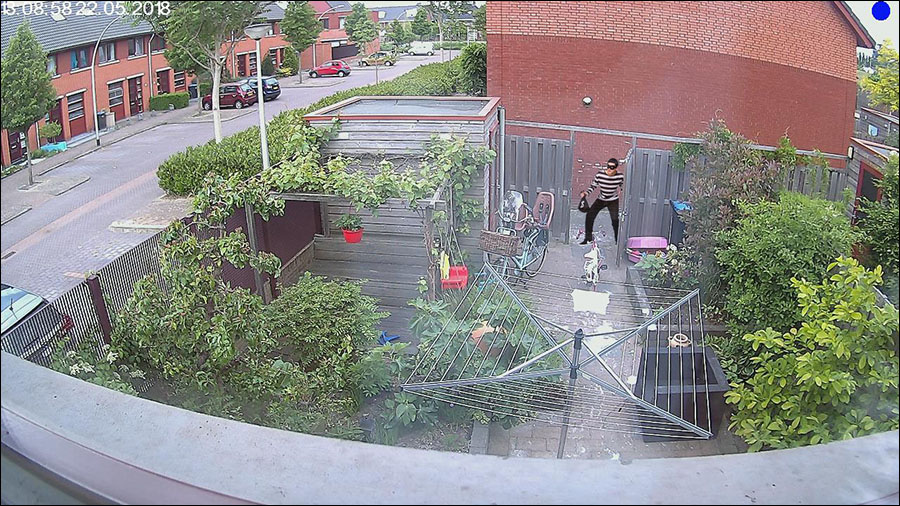
When you have kids, you know they leave doors open. In this case, the gate in our garden. This does not have to be a big problem, except when there are bikes unlocked in the backyard. After all: we don’t want them to be stolen!
I have a Home Automation platform running, but I don’t want to equip my bikes with sensors. I also don’t want to put sensors on this wooden gate in my fence.
How can I monitor the situation and be alerted when this situation happens?
Solution overview
The solution consists of four major pieces:
-
Home Assistant
Home Assistant is an open-source home automation platform running on Python 3. You can track and control all devices at home and automate control.
-
CustomVision.ai
With CustomVision.ai you can easily customize your own state-of-the-art computer vision models that fit perfectly with your unique use case. Just bring a few examples of labeled images and let Custom Vision do the hard work of training and testing the AI model.
-
Azure Functions
Accelerate your development with an event-driven, serverless compute experience. Scale on demand and pay only for the resources you consume.
-
Dafang Hacks
This is the custom firmware for the Xiaomi Dafang camera which enables motion tracking, full HD camera images and MQTT publishing.
The camera publishes messages to a MQTT topic when motion is detected. These ‘motion-detected’ messages are published on the MQTT Broker inside of Home Assistant. An Azure Function is subscribed to this topic: it gets the current picture of the camera and pushes this image to the Custom Vision api. This Custom Vision is trained by me and knows what an open gate and a bike looks like. The result is parsed in the Azure Function and then published back to the MQTT broker. In Home Assistant a sensor is configured to listen to this result and with that, I can do all sorts of cool stuff with these values inside of Home Assistant.
The hardware
The Home Assistant host
There are multiple ways to host Home Assistant. I want my Home Automation to work, also without Internet. Therefore I run Home Assistant using Hassio on a Raspberry Pi 3.
Xiaomi Dafang Camera

This camera is both cheap and feature-rich. It’s only ±30 euros at GearBest and AliExpress
I’ve updated the camera’s firmware to be able to use it in a more advanced manner. With the Dafang Hacks Custom Firmware there are lots of possibilities. Also check out their documentation on how to integrate with Home Assistant.
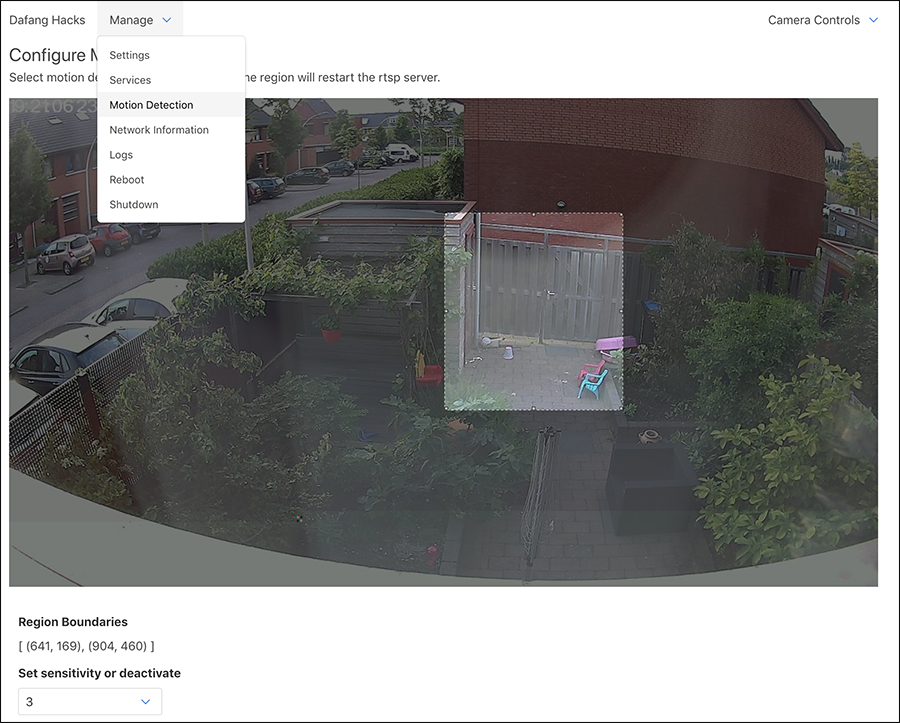
This image shows the web interface of the Dafang camera. As you can see, it’s easy to setup a zone for motion detection. I don’t want motion-events when a car drives by or when the wind blows the plants too much.
Home Assistant
My home is automated using Home Assistant and it is configured using YAML files. My configuration is open: check it out on GitHub.
I use HA for all kinds of stuff, for example, I turn on/off my Yeelight Smart Led Bulb’s using Xiaomis wall switches and Alexa. I measure all sorts of sensors, for example Eneco Toon, motion, humidity, etc. (mostly using Xiaomi Home). We get a push notification when the washing machine is ready, etc. etc.
In the context of this project, Home Assistant does four things:
- Acts as the MQTT broker (what is MQTT)
- Processes the status of objects in the backyard (gate,door,bikes) based on MQTT messages as persist this state as sensor-value in HA (MQTT Sensor config
- The UI for the camera feed and door/bike status (Camera Dashboard Config)
- Run the automations (Example Automation)
MQTT & Azure Functions
When the camera detects motion, it publishes a message on an MQTT topic. The MQTT broker is hosted with my Home Assisant because I want the core features of my home automation platform to be offline-capable. I find the ‘is the gate open’-feature not critical and therefore I don’t require it to be offline-capable and that’s why, at this moment in time, doing the detection in the cloud is fine.
I need, of course, something to subscribe to these messages. As a passionate Azure developer, I immediately thought of Azure Functions. This because it’s cheap, serverless, message-based and really easy to use. Azure Function did not have a MQTT Trigger binding, so I wrote one. This will be another blogpost in the near future but in the meantime, feel free to check out this work in the GitHub reposity: ‘Mqtt Bindings for Azure Functions’.
This Azure Function now does five things:
- Get’s triggered by a MQTT message when motion is detected
- Goes back to my camera to get the image
- Pushes this image to Azure Storage for later reference
- Executes the trained Object Detection model (more on this in the next chapter)
- Publishes MQTT ‘return’ messages for the results (is the gate open or not, is there a bike visible?)
All of this, I call my ‘backend’. The code of the cloud backend for my home automation can be found on GitHub: ‘Home-Assistant-Backend’.
I did some extra stuff in this codebase, but if you want, this could easily be written in less than 20 lines of code!
CustomVision.ai
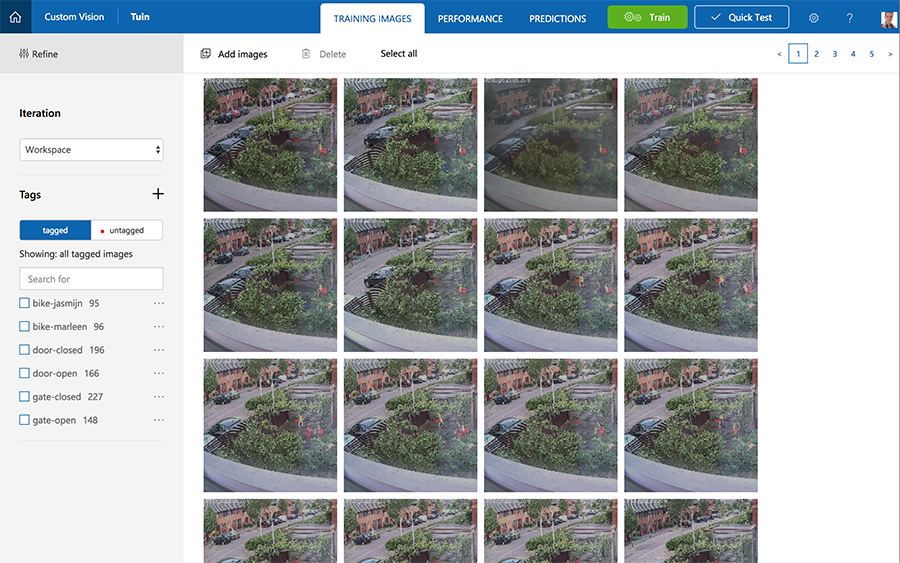
CustomVision.ai makes it really easy to train an AI model to detect objects in an image. It starts with training. You have to provide some example images where you set what the objects, you’re searching for, look like. In my case I trained the service to detect the following ‘tags’:
- Gate open
- Gate closed
- Barn door open
- Barn door closed
- Bike Jasmijn (kids bike)
- Bike Marleen (wifes bike)
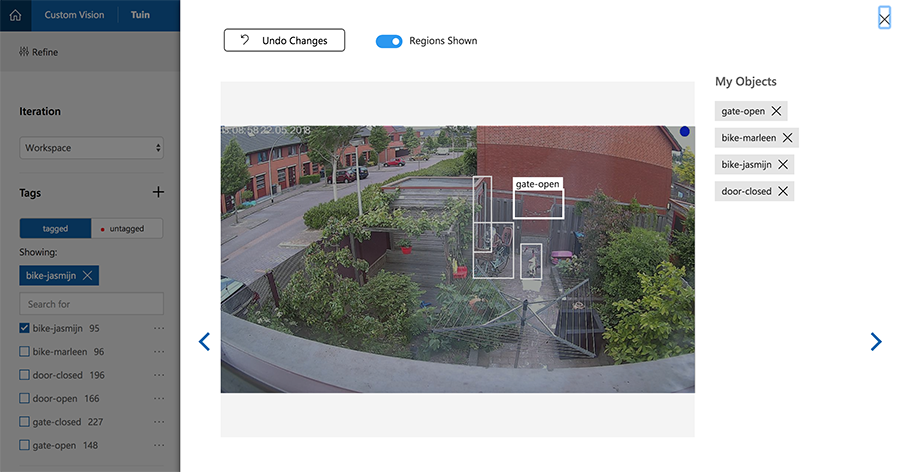
Below some screens of CustomVision.ai,
The first image shows the index of training images. The second image shows the screen to set the objects on the training image The third screen shows the results of a training run
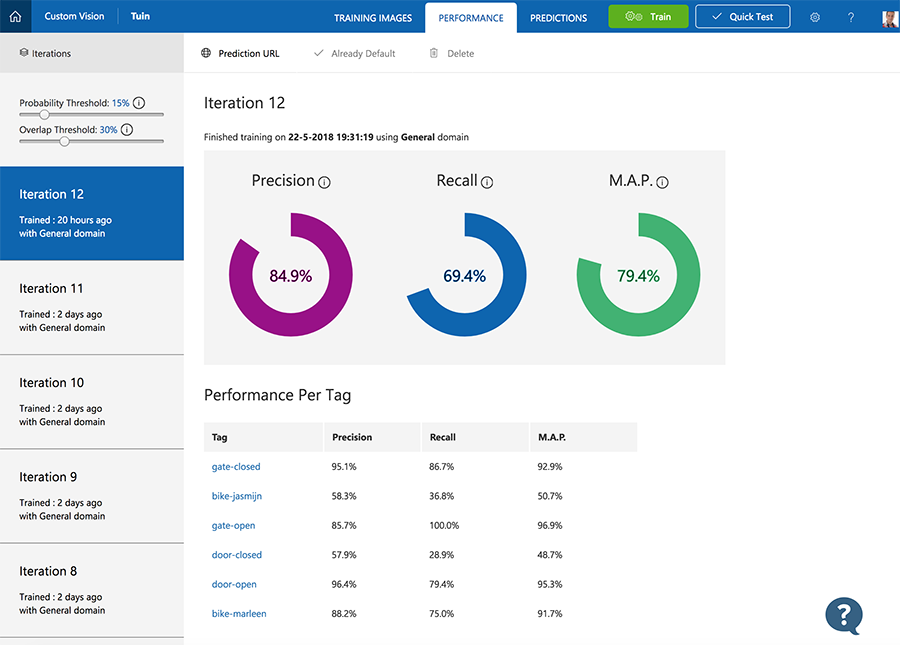
When each tag has 15 or more training images the model can be trained, the result of this training is called an interaction and can be used.
Now we can use this trained model to detect objects in (new) images using their API. I’ve implemented the backend in C# therefore I interact with this API using their SDK, available as a NuGet package: Microsoft.Azure.CognitiveServices.Vision.CustomVision.Prediction. I used step 6 of this How-To to get this working. The code calling this CustomVision API is as simple as this:
var endpoint = new PredictionEndpoint() { ApiKey = _config.PredictionKey };
var predictionResult = await endpoint.PredictImageAsync(new Guid(_config.ProjectId), streamOfImage);

foreach (var c in predictionResult.Predictions)
{
    _log.LogDebug($"\t{c.TagName}: {c.Probability:P1}");
}

var meaningfulPredictions = predictionResult.Predictions.Where(x => x.Probability > 0.15);
After images are sent to CustomVision.ai the predictions can be monitored. Each result can be turned into a new test sample to train the model even better.
At this point I use CustomVision.ai but I’ll expect to move to the Azure Based computer vision PaaS service. CustomVision.ai is a good kickstarter because it has an easy-to-use UI to play with.

Bad detections
Sometimes the detection makes mistakes, like this:
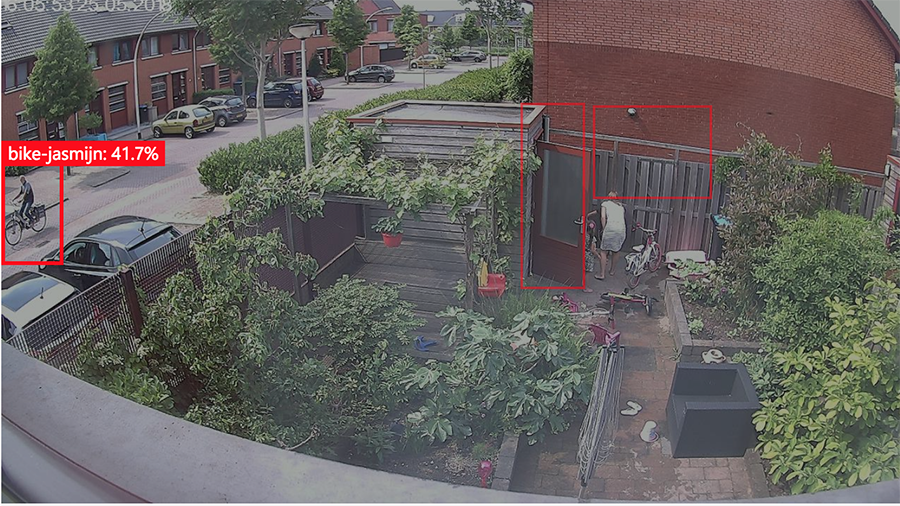
In my experience this almost never happens. Every evening, I take some time to (by hand) process about 50 images of the day to train the model even further. In this example Jasmijns bike was visible, but in a new ‘rotation’ (steer to the right) which was unknown up to that point. It will require time to train the model in order to increase the accuracy. I now have ±400 training images and this has resulted in an accuracy of 97%.
Costs
Apart from the hardware everything in this setup is (almost) free.
Home Assistant is free.
The backend is hosted in Azure. The Azure Function is hosted in the ‘Consumption plan’. This comes with 1.000.000 function runs free, every month! My backyard generates ± 5000 predections/motion-detections per month.
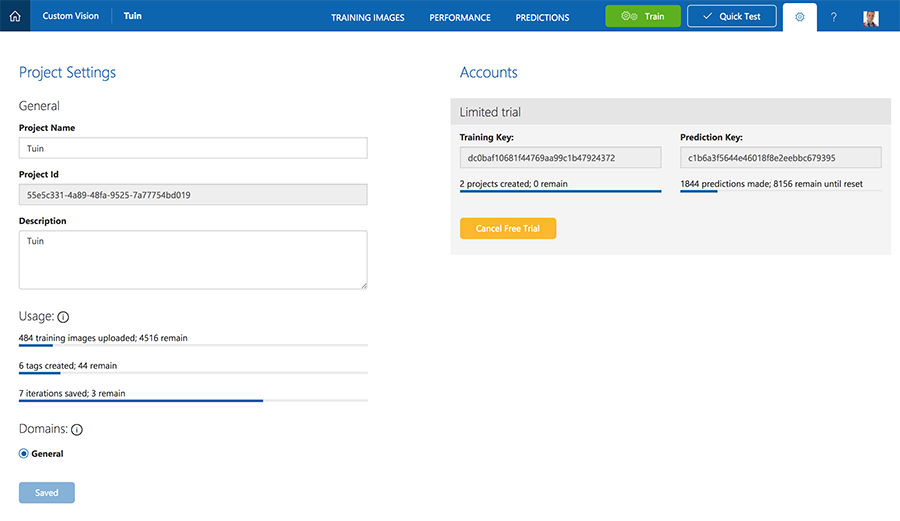
Then we have CustomVision.ai. The free model for Custom Vision includes:
- 2 projects (1 per camera in this type of use)
- 50 tags (‘bike’, ‘door’, etc.)
- 10.000 predictions
I use only 6 tags and ±5000 predictions per month. So this is free for me as well.
The only costs I make are because of my cloud storage (nice to have). My motion snapshots are persisted in Azure Blob Storage. These files are ±1mb for me so this increases with 5gb every month, this is equal to ±25ct per month…
The result
I added these four indicators to my Home Assistant dashboard along with a live view of the backyard with and a latest motion-snapshot. These values can be seen in the screenshot below, in the middle column (‘Backyard’);
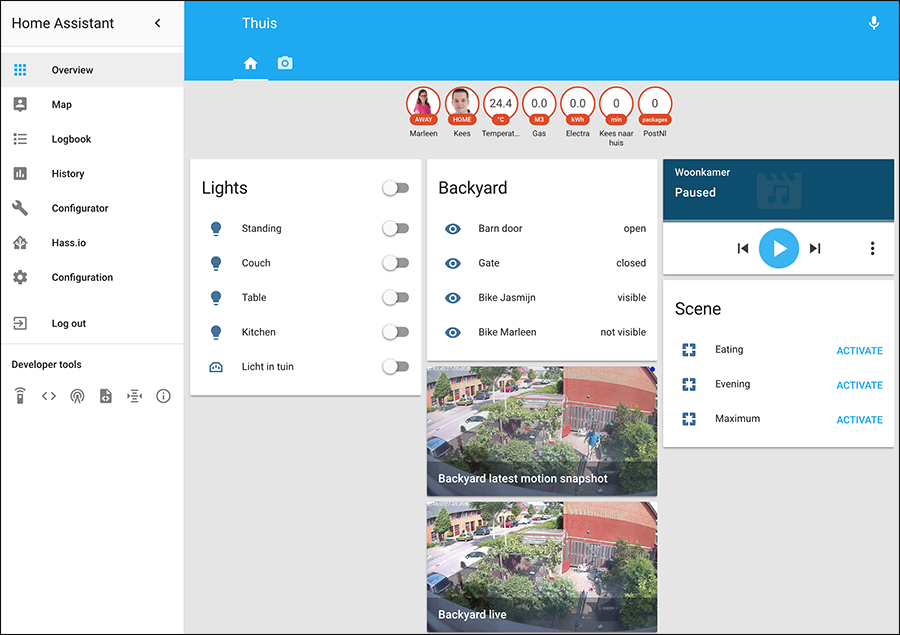
I can now use these ‘sensor-states’ in all of my Home Assitant goodness… Endless possibilities.